See Confluence Setup Archive for older versions of Confluence. |
Confluence is a knowledge management system. If you are not sure why you would want to use Confluence, you might want to read the Introduction to Knowledge Management.
This article takes you through a Confluence 4.x setup using the following software stack,
Here is a logical diagram of how Confluence will be setup,
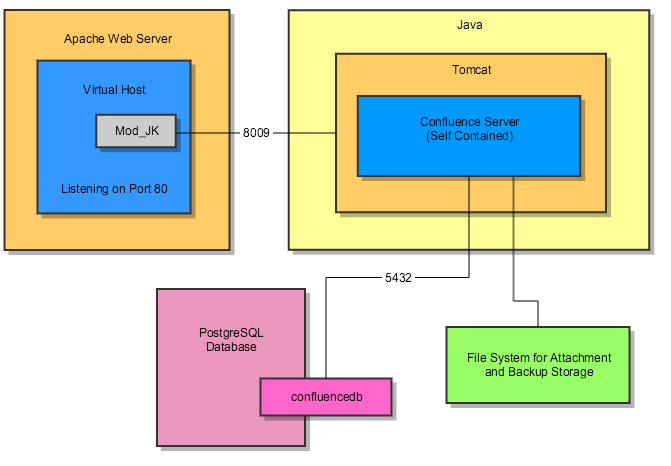
Ideally your system should have about 3 GB of memory set aside for Confluence. If you stay below Confluence 6.0 (before Synchrony was introduced) you would get away with 2GB of Memory using Java 32-bit.
Confluence and in turn Java uses fonts to export to pdf and show powerpoint slides. According to Oracle for Solaris and Unix there is a requirement for valid X11 fonts.
sudo apt-get install fontconfig |
Confluence comes with its own embedded database called hsqldb. However, for real production use you should use a full fledged database like PostgreSQL. It is recommended to install a supported version.
Install PostgreSQL on Ubuntu.
Go to the Confluence download page and get the most recent Linux tar.gz install package and decompress it,
su - serveradmin # if you are not already wget http://www.atlassian.com/software/confluence/downloads/binary/atlassian-confluence-4.0.5.tar.gz gunzip atlassian-confluence-4.0.5.tar.gz tar -xvpf atlassian-confluence-4.0.5.tar su - bhitch # log in as a staff user that can run sudo # Use specific version numbers. This will make upgrade easier in the future. sudo mv /home/serveradmin/atlassian-confluence-4.0.5/ /opt/ |
Next, we make the symbolic link directory. Scripts and anything else you do will use the symbolic link directory. When the new version of Confluence comes along you have various options for upgrading.
su - bhitch # log in as a staff user that can run sudo cd /opt # make a symbolic link which scripts and commands can run against sudo ln -s ./atlassian-confluence-4.0.5 ./confluence |
I use a manual Java setup with an instance of Java specifically for the application.
Make sure to ensure that the version of Confluence supports the JRE. |
Log in as your staff account which has sudo access to perform the actual move to /opt/
cd /home/serveradmin sudo mv ./java/ /opt/confluence/ |
The downloaded Confluence package is powered by Tomcat. You can specify Tomcat use a specific java directory.
modifying the Confluence /setenv.sh file and test with version.sh
Follow the section of Portable Tomcat 6.x & Instances described in the table below. Also make sure to adjust the file paths as shown,
| Section | Tomcat | Confluence |
|---|---|---|
| Run Tomcat with a Specific Java Version Using setenv.sh | opt/apache/tomcat.1/bin/setenv.sh | /opt/confluence/bin/setenv.sh |
| opt/apache/tomcat.1/bin/version.sh | /opt/confluence/bin/bin/version.sh |
Your resulting Confluence setenv.sh file will look like this,
# See the CATALINA_OPTS below for tuning the JVM arguments used to start Confluence.

# Bonsaiframework - Modification Start
# --------------------------------------
JRE_HOME="$CATALINA_HOME"/java
JAVA_HOME="$CATALINA_HOME"/java
# --------------------------------------
# Bonsaiframework - Modification End

echo "If you encounter issues starting up Confluence, please see the Installation guide at http://confluence.atlassian.com/display/DOC/Confluence+Installation+Guide"
# set the location of the pid file
if [ -z "$CATALINA_PID" ] ; then
    if [ -n "$CATALINA_BASE" ] ; then
        CATALINA_PID="$CATALINA_BASE"/work/catalina.pid
    elif [ -n "$CATALINA_HOME" ] ; then
        CATALINA_PID="$CATALINA_HOME"/work/catalina.pid
    fi
fi
export CATALINA_PID |
Now test with version.sh and you'll see something along these lines,
./version.sh If you encounter issues starting up Confluence, please see the Installation guide at http://confluence.atlassian.com/display/DOC/Confluence+Installation+Guide Server startup logs are located in /opt/confluence/logs/catalina.out Using CATALINA_BASE: /opt/confluence Using CATALINA_HOME: /opt/confluence Using CATALINA_TMPDIR: /opt/confluence/temp Using JRE_HOME: /opt/confluence/java Using CLASSPATH: /opt/confluence/bin/bootstrap.jar:/opt/confluence/bin/tomcat-juli.jar Using CATALINA_PID: /opt/confluence/work/catalina.pid Server version: Apache Tomcat/8.0.36 Server built: Jun 9 2016 13:55:50 UTC Server number: 8.0.36.0 OS Name: Linux OS Version: 4.15.0-54-generic Architecture: amd64 JVM Version: 12.0.2+10 JVM Vendor: Oracle Corporation |
To prevent read errors and for security purposes we want Confluence to only run as with the operating account serveradmin.
Confluence 4.x introduced their own script files to also perform this check when running start-confluence.sh and stop-confluence.sh. However, admins can still accidentally run startup.sh or shutdown.sh. |
Follow the section of Portable Tomcat 6.x & Instances described in the table below. Also make sure to adjust the file paths as shown,
| Section | Tomcat | Confluence |
|---|---|---|
| Only Allow serveradmin to Run Tomcat | /opt/apache/tomcat.1/bin/startup.sh | /opt/confluence/bin/startup.sh |
| /opt/apache/tomcat.1/bin/shutdown.sh | /opt/confluence/bin/shutdown.sh |
As of Confluence 4.x, new start up scripts added,
These scripts also rely on the file /opt/confluence/bin/user.sh which sets what user is allowed to start and stop Confluence. Normally this file is populated by the installer script. Since we are doing a manual install modify user.sh as follows,
# START INSTALLER MAGIC ! DO NOT EDIT ! CONF_USER="serveradmin" # Only this user may run start-confluence.sh or stop-confluence.sh # END INSTALLER MAGIC ! DO NOT EDIT ! export CONF_USER |
Also we need to create the home directory,
su - serveradmin cd ~ mkdir confluence-data # Don't use specific version numbers here because the data will actually be upgraded su - bhitch # to get sudo access sudo mv /home/serveradmin/confluence-data /opt/ |
As serveradmin, set the home (data) directory by adding confluence.home to the bottom of, /opt/confluence/confluence/WEB-INF/classes/confluence-init.properties,
# confluence.home=c:/confluence/data |
In a multipurpose environment, you may want to restrict access to the Confluence folders. The BonsaiFramework uses the following approach,
serveradmin user = Start, Stop and install Confluence
serveradmin group = Created by default but not outright used.
staff group = Provided to trusted staff who administer the server. Staff users are granted read only access to monitor logs if they need to troubleshoot the system.
other = The other permission grants absolutely no access. For example, imagine another process using user appx is compromised. The userid appx will not be able to view any Confluence files.
As such the following additional permission are set,
cd /opt sudo chown -R serveradmin:staff ./confluence/ ./confluence-data/ sudo chmod -R o-rwx ./confluence ./confluence-data/ |
Now only users belonging to staff or serveradmin can view the Confluence folders.
However, this is not enough. Any new files created in those directories will change to what the particular user has set in terms of that user's groups. This also includes the process user serveradmin. The log files created when Confluence start will belong to serveradmin user and serveradmin group - which we don't want. So to fix this we tell the Directories to set the setgid bit,
cd /opt
sudo find ./confluence/ -type d | sudo xargs -I{} chmod g+s {}
sudo find ./confluence-data/ -type d | sudo xargs -I{} chmod g+s {}
|
These are the command line version of the instructions from Confluences wiki on setting up an external database.
The commands were derived from the visual guide by Confluence.
First log into the PostgreSQL prompt as explained in PostgreSQL on Ubuntu.
Create the confluence database admin account.
Make sure to change putYourPasswordHere to a secure password. |
If following the Bonsaiframework Server Standards, the password would use an algorithm based on the server name.
CREATE ROLE confluencedbuser LOGIN ENCRYPTED PASSWORD 'putYourPasswordHere' NOINHERIT VALID UNTIL 'infinity'; COMMENT ON ROLE confluencedbuser IS 'Account used by the Confluence application.'; |
Create the database.
CREATE DATABASE confluencedb WITH ENCODING='UTF8' OWNER=confluencedbuser CONNECTION LIMIT=-1; |
If all goes well the response will be,
CREATE DATABASE |
Finally quit the PostgreSQL prompt,
\quit |
The name of the database is different than in the confluence documentation. Rather than the database name confluence, we use confluencedb to clearly designate a database. |
Generally, Confluence is pretty good at packaging the most up to date JDBC driver or their supported databases and you can skip this step.
However, for enterprise class systems, it is a good idea to check if there is an important update available.
For example, we had one situation where the particular version of the PostgreSQL JDBC driver had a memory leak that would crash Confluence. Determine your version of PostgreSQL by logging into the server running the database and executing,
psql --version # this will return the version psql (PostgreSQL) 9.3.9 |
Downloading the matching JDBC driver from the PostgreSQL website. Review the chart showing version of Java with Postgres. Replacing the old jar the /opt/confluence/confluence/WEB-INF/lib/ directory,
su - serveradmin cd /opt/confluence/confluence/WEB-INF/lib/ # delete the existing jar ls postgres* postgresql-9.2-1002.jdbc4.jar rm postgresql-9.2-1002.jdbc4.jar # Delete the old jar file # In this case the version of Java and Postgres calls for using a newer jdbc41 driver, wget https://jdbc.postgresql.org/download/postgresql-9.3-1103.jdbc41.jar |
Starting Confluence for the first time involves going starting the process and using a wizard to build the initial database.
If using virtual machine technology, now would be a good time to take a snapshot of the system. |
To start confluence,
cd /opt/confluence/bin/ ./start-confluence.sh |
Next, visit the website with a browser, http://krypton:8090/ to start the first time configuration wizard.
If you have been following these notes on how to setup Ubuntu, your firewall may be enabled. Make sure to enable access to port 8090. |
Step through the configuration wizard and make the following selections,
At this point if you happen to be monitoring your system you should see a spike in CPU and confluence slowly taking up more memory. Be patient as this step can take a few minutes as the tables and contents of the database are generated.
If all goes well the you will be prompted to Load Content. You can opt to load some default content, start with a blank slate or restore from backed up data if you are rebuilding from a previous installation of Confluence.
The intial user will be called "Server Admin" with user name serveradmin. Use a special email for this account and keep in mind that Confluence enforces that email addresses must be unique across all users.
There appears to be a problem with shutting down the Confluence server. According to Atlassian, this only happens on certain configuration and they are not able to determine yet why. I have personally experienced with every type of Virtualized Ubuntu system I have setup over the past few years. It seems to occur once there is 2-3 users worth of activity and data in the wiki.
This shutdown bug has been resolved with Confluence 4.x, however, it is good practice to verify that everything shut down properly. |
Start by performing a normal shutdown,
su - svradm /opt/confluence/bin/stop-confluence.sh |
Next ensure that Confluence actually shut down,
ps -ef | grep java | grep confluence |
The resulting output shows all your java processes. Ensure that you Confluence java process does not exist. It should looks something similar to below,
svradm 2364 1 0 01:00 ? 00:02:37 /opt/confluence/java/bin/java -Djava.util.logging.config.file=/opt/confluence/conf/logging.properties -Xms256m -Xmx512m -XX:MaxPermSize=256m -Djava.awt.headless=true -java.util.logging.manager=org.apache.juli.ClassLoaderLogManager -Djava.endorsed.dirs=/opt/confluence/endorsed -classpath /opt/confluence/bin/bootstrap.jar -Dcatalina.base=/opt/confluence -Dcatalina.home=/opt/confluence -Djava.io.tmpdir=/opt/confluence/temp org.apache.catalina.startup.Bootstrap start |
If it does not exist then the shutdown occurred properly. If it does exist, wait a few minutes and run the above ps command again. The shutdown process can be slow.
If the Confluence process still exists after a few minutes you need to kill the process,
kill 2364 # Note change 2364, to the process ID that you see on your screen. |
TBC - This section still needs to be written to take the user through setting up the base url, creating their first space with subsections to disabling automatic backup, how to do real backups and any other important activities. |
These instructions should be written with more detail. Particularly, "Setup email". |
There are some basic tasks we should do before getting other people on board.
Once logged in go to, Browser, Confluence Admin. There are tasks there that Confluence recommends, the most important to us being,
In the case of a private site, you may not want Google or any other search engine to crawl your wiki. Even in the case of a password protected site this will still happen and take up unnecessary bandwidth, processing and bump up the amount of memory consumed by Confluence.
This content needs to be refined and should in fact link to a detailed article on robots.txt and other ways of preventing crawling. |
If you had been following the steps outline by the Bonsai Framework the Confluence configuration will be,
As such, robots.txt will be placed in the root of the website and look like this,
User-agent: * Disallow: /wiki/ |
This is optional, but in an environment with sensitive data you may want to see what users are doing what,
https://confluence.atlassian.com/display/CONFKB/How+to+Enable+User+Access+Logging
As this install of Confluence is powered by Tomcat we can front Confluence with the Apache Web Server.
First start with setting up your Web Server.
....
Start by reviewing the generic instructions to configure Tomcat (the engine that Confluence uses) with Apache using mod_jk.
| As of Confluence 6. or later, it is no longer endorsed to use only mod_jk to proxy. This is because Synchrony, which is required for collaborative editing, cannot accept AJP connections. The preferred configuration is Using Apache with mod_proxy. |
First we must enable the the Connector. In this example we will use the standard port 8009 in the Confluence Tomcat. Edit /opt/confluence/conf/server.xml.
Add the Connector directive <Connector port="8009" protocol="AJP/1.3 "URIEncoding="UTF-8" /> just above the Engine directive,
useURIValidationHack="false" URIEncoding="UTF-8"/>

        <Connector port="8009" protocol="AJP/1.3" URIEncoding="UTF-8" />

<Engine name="Standalone" |
The UTF-8 is important as Confluence is developed to post using UTF-8. Without this setting errors occur when working with attachments containing special characters. Further details are covered in the Bonsai Tomcat Connector article. |
Often you want to use the Apache Web Server to front more than one web application. In order to do this you want each web application to work within it's own context. This is pretty standard in most java applications. As such, we will pick a context path, in this case "wiki". As such the original url, http://localhost:8090/ changes to http://localhost:8090/wiki
Modify the bundled Confluence Tomcat Context directive by modifying the file, /opt/confluence/conf/server.xml changing the attribute path="" to path="/wiki",
<Context path="/wiki" docBase="../confluence" debug="0" reloadable="false" useHttpOnly="true"> |
This change does not take effect until the Confluence service stopped and started again. We will do that in the the next section.
Still need to fill in clearer instructions on this topic. |
Once port 8009 is enabled, mod_jk can be enabled by following the Apache Tomcat Connector instructions.
Put instructions here about changing the base url if fronted by Apache. |
Even if you do not plan to have the wiki work for multiple languages, you should verify the internationalization is working properly just to handle special characters.
Visit the http://<host address>:<port>/admin/encodingtest.action url on your system and follow the instructions.
As part of planning for future upgrades here is a checklist to keep in mind. As an example, we will be upgrading from Confluence 4.0.5 to 4.3.2.
Take note of any significant changes, especially between larger release numbers.
It goes without saying, backup your data. With Cloud and Virtual computing take a snap shot. With manual backups you can use Confluence's built in backup utility through the web interface (to do: provide link to instructions) or manually make the following backups,
Make sure you know the admin password for your database.
Make sure to copy over the java folder or take this opportunity to install an updated version of Java.
To copy the existing version of Java,
su - serveradmin cp -R /opt/confluence/java /opt/atlassian-confluence-4.3.2/java exit sudo ln -s ./atlassian-confluence-4.0.5 ./confluence |
Follow the steps in this article about how to Manually Setup the JRE.
Check Database Driver
Check that the version of Java and the Postgres JDBC version match up and and update accordingly (see setup instructions in this same article for details).
Over time this may change, for example the user.sh file was added when moving between Confluece 3.x and 4.x. So, whoever does the upgrade please update the notes below,
Verification of identified upgrade files history,
|
Merge the following key files,
If you had enabled logging of user activity,
If you use Araxis Merge and Expand Drive, I have developed a comparison script to quickly load all required files.
Note that for Solaris the file /opt/confluence/bin/start-confluence.sh, the call to the 'id' binary needs to be updated to point to '/usr/xpg4/bin/id' |
Optionally, if there was a version mismatch with the jdbc driver,
You may choose to modify special files. For example, I modify the footer,
If you used a symbolic link as described in this article, make sure to update your symbolic link,
cd /opt/ sudo rm confluence sudo ln -s ./atlassian-confluence-4.3.2 ./confluence |
Also, keep a page listing any plug-ins you install. Upgrades generally do not require you to reinstall the plugins but they might be deprecated. After the upgrade is done, login as Administrator on Confluence and ensure plug-ins are up to date.
Our recommended list of plugins,
Check out the Confluence Plugins page for more details. |
The Administration Console may also have messages for you to run specific tasks with instructions. For example when upgrading from 3.5.4 to 4.1, "Update content with incompatible upgraded macros".
Ensure any customization done are carried over.
... done up above list files...
Currently, Confluence does not provide an easy way to change the favicon.ico that will persist after an upgrade. If you want this feature, vote for this request on Jira. Otherwise, a good solution may be implemented using Apache's mod_rewrite.
Enable mod_rewrite
sudo a2enmod rewrite sudo /etc/init.d/apache2 restart |
Edit your virtual host file adding the following after the JKMount points,
    ...
    JkMount /wiki tomcat_confluence_a_worker
    # Rewrite for favicon.ico
RewriteRule ^/wiki/favicon.ico$ /favicon.ico |
Make sure to change /wiki/ if you decided to deviate from this tutorial.
Finally drop a favicon.ico into your virtual host's root directory. In this example, /home/www.krypton.com/www/
Using htop, initial setup without any spaces created is 396MB. The process itself uses VIRT=913M and RES=338M.
If you are migrating a Confluence instance to a new server and the Server ID was not changed after a full restore.
Check the confluence.cfg.xml located in the confluence-data directory there will be a line listed.
Stop Confluence and make sure to do a back up of this server ID as it can make your confluence unusable if you make a mistake.
<property name="confluence.setup.server.id">XXXX-XXXX-XXXX-XXXX</property> |
Change the Server ID in this line and save it. Now you will need to make sure it is also in the confluence database.
Login to your confluence database, here is how it can be done with postgres user.
sudo -u postgres psql postgres \connect DBNAME |
Now check the server ID and then change it if needed.
select * from BANDANA where bandanakey = 'confluence.server.id';
 bandanaid | bandanacontext |      bandanakey      |             bandanavalue
-----------+----------------+----------------------+--------------------------------------
         4 | _GLOBAL        | confluence.server.id | <string>BBP9-O5SW-YSZW-GWLR</string>
(1 row) |
Update the ID if it does not match the ID in confluence.cfg.xml.
update BANDANA set bandanavalue = '<string>XXXX-XXXX-XXXX-XXXX</string>' where bandanakey = 'confluence.server.id'; |
Now start confluence and check the License Details for your changes and update your License key accordingly.