This article will cover setting up network interface configurations for virtual machines (VMs) and corresponding load balancers (LBs) within your Azure subscription. Before we begin, it is important to distinguish the important disparities between networking in Azure V1 (Classic) and Azure V2 (Resource Manager). This article will focus solely on the latter.
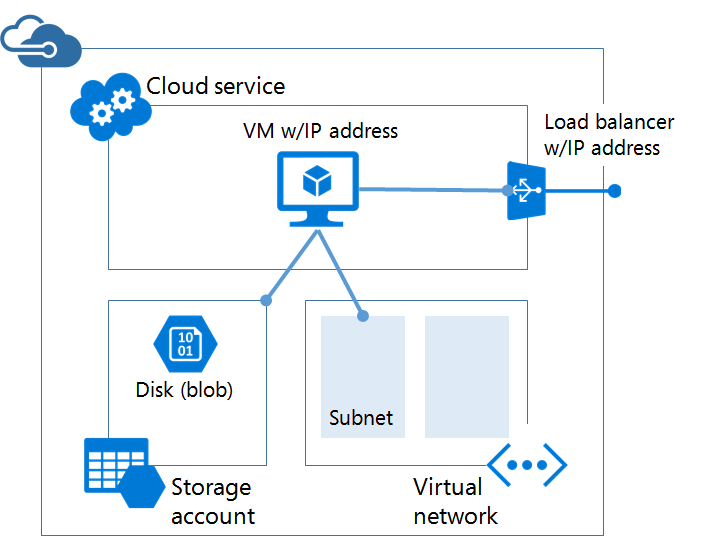
The of doing networking in the classic management portal was to wrap everything up in an abstraction known as the cloud service. he cloud service itself had a public IP address and then NAT rules would be created, using an endpoint, that opened a UDP or TCP port to the public using the cloud service's public IP address. Load balancing was achieved by simply duplicating an endpoint across two or more virtual machines. Virtual machines themselves could be connected to Internet with a public IP address, but these machines could not be load balanced. Effectively your network would look like this:
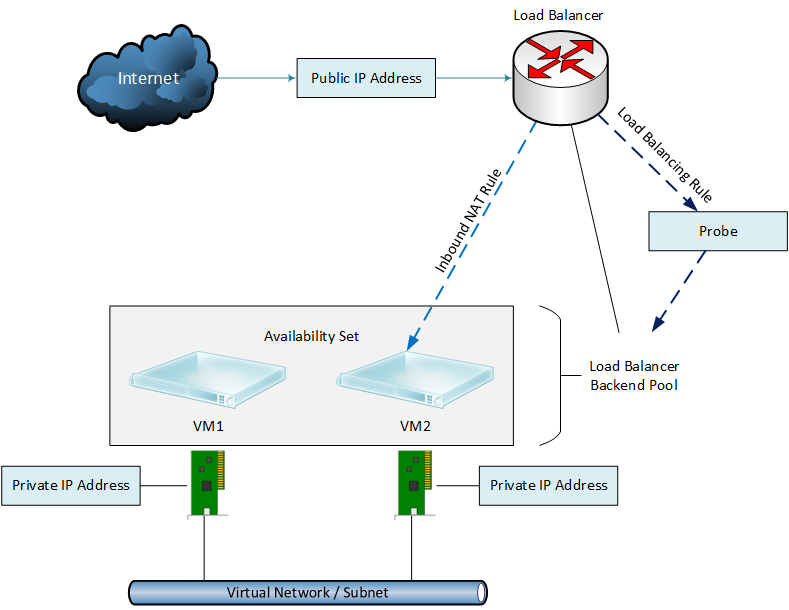
Things have changed significantly since the inception of ARM. Cloud service and endpoints have been eradicated. Instead a virtual network (VN) is designed with one or more subnets. For each virtual machine, a NIC is created and connected to a subnet in the VN and assigned an IP address within that subnet. Network security groups can be assigned to allow/deny traffic. As in classic mode, virtual machines are assigned a public IP address to expose it to the Internet. However, load balancing is no longer inherent in the network, instead they are separately provisioned.
It is important to note that an ARM load balancer is not a VM nor a network appliance but rather a function within the Network Resource Provider. A backend pool is configured within the load balancer and then associated to one or more virtual machines or to an availability set. A load balancer can only be associated to one availability set but you can create more than one backend pool from a single availability set and a VM can reside in more than one backend pool. The Azure network using Resource Manager looks like this:
While we will be outlining the basic steps to configure a typical LB/VM setup within your Virtual network, we will be also discussing three additional permutations for reference. These variations are:
To begin, we will start with the most basic configuration, which is the VMs setup with a single NIC instance. Essentially when you complete the steps below you will have a network resembling the following:
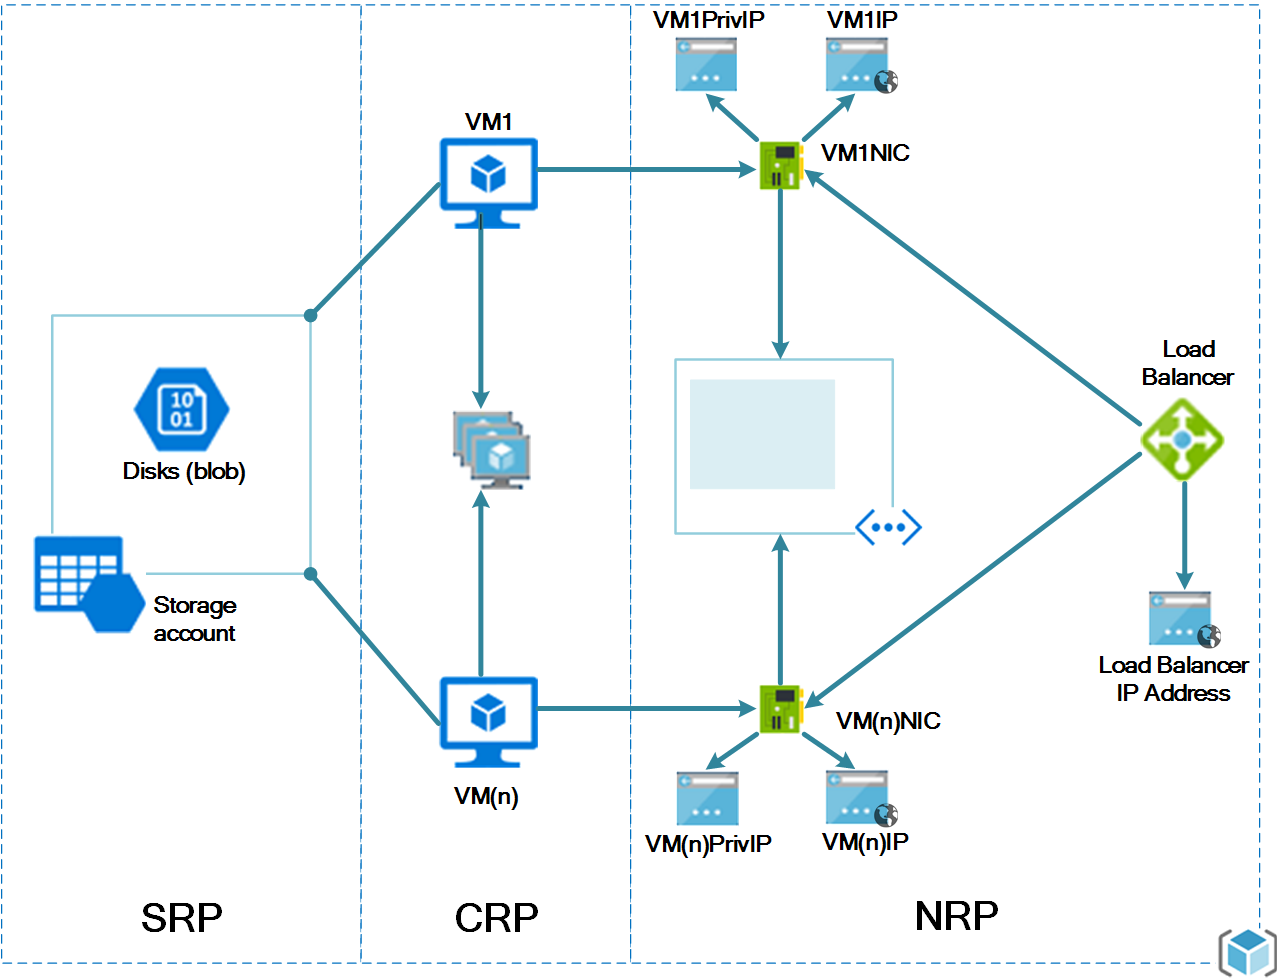
The diagram above segregates the components logically by their resource providers; Storage Resource Provider (SRP), Compute Resource Provider (CRP) and Network Resource Provider (NRP) respectively. You can learn more about Resource Providers here.
you wish to use to implement your virtual network.
Using Azure Portal
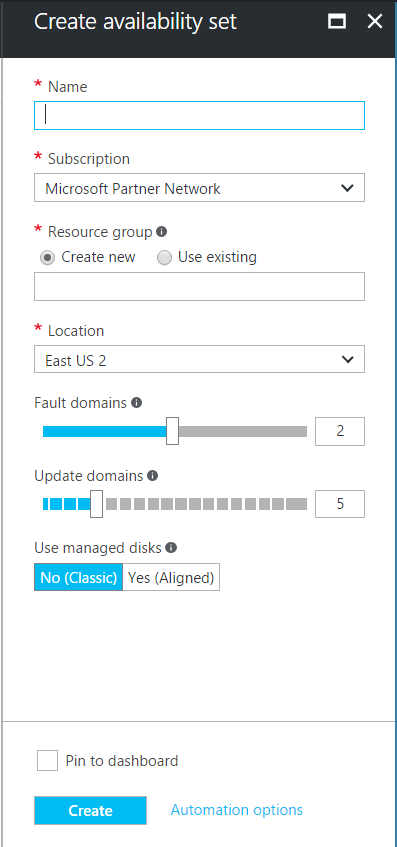
Create Availability Set(s) (Optional)
If you are creating more than one virtual machine (or more correctly, deploying an application with more than one tier) it may be advantageous to create availability sets. The purpose of availability sets is that the Azure platform has no way of distinguishing the application tiers associated with each VM. This could lead to a single point of failure across your entire application. When a VM is added to an availability set, by default Azure assigns it to two Fault Domains and five Update Domains. The VMs are allocated across these domains to ensure that not all VMs within a set will fail together. It is important to note that availability sets that contain only a single VM are not subjects to Azure's SLA. More information on availability sets can be found here.
Create the Virtual Machine(s).
Provision one or more virtual machines by clicking  menu icon and then selecting the
  button.
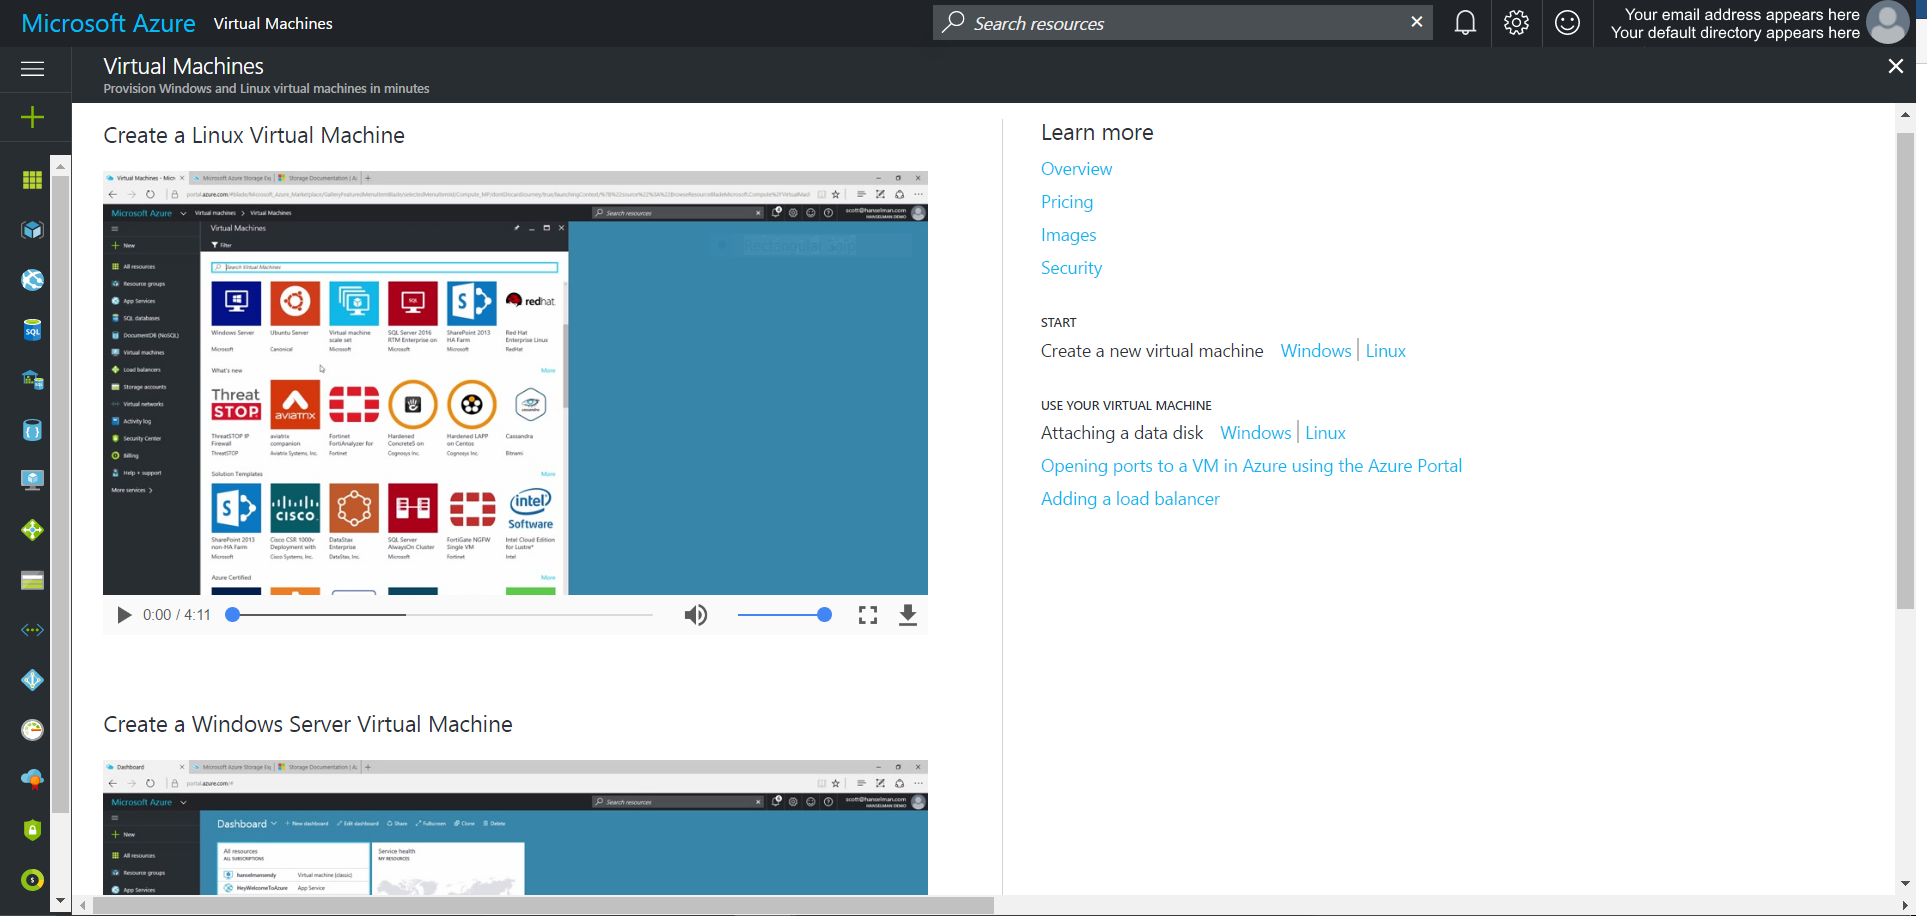
By default, when using the Azure Portal, a new Virtual Machine will be provisioned with a single NIC with one public IP address and one private IP address on the subnet specified during setup. The network security group initial configuration is set to deny all inbound traffic to the virtual machine from outside the subnet, with the exception of port 22, which is used to SSH into the server.
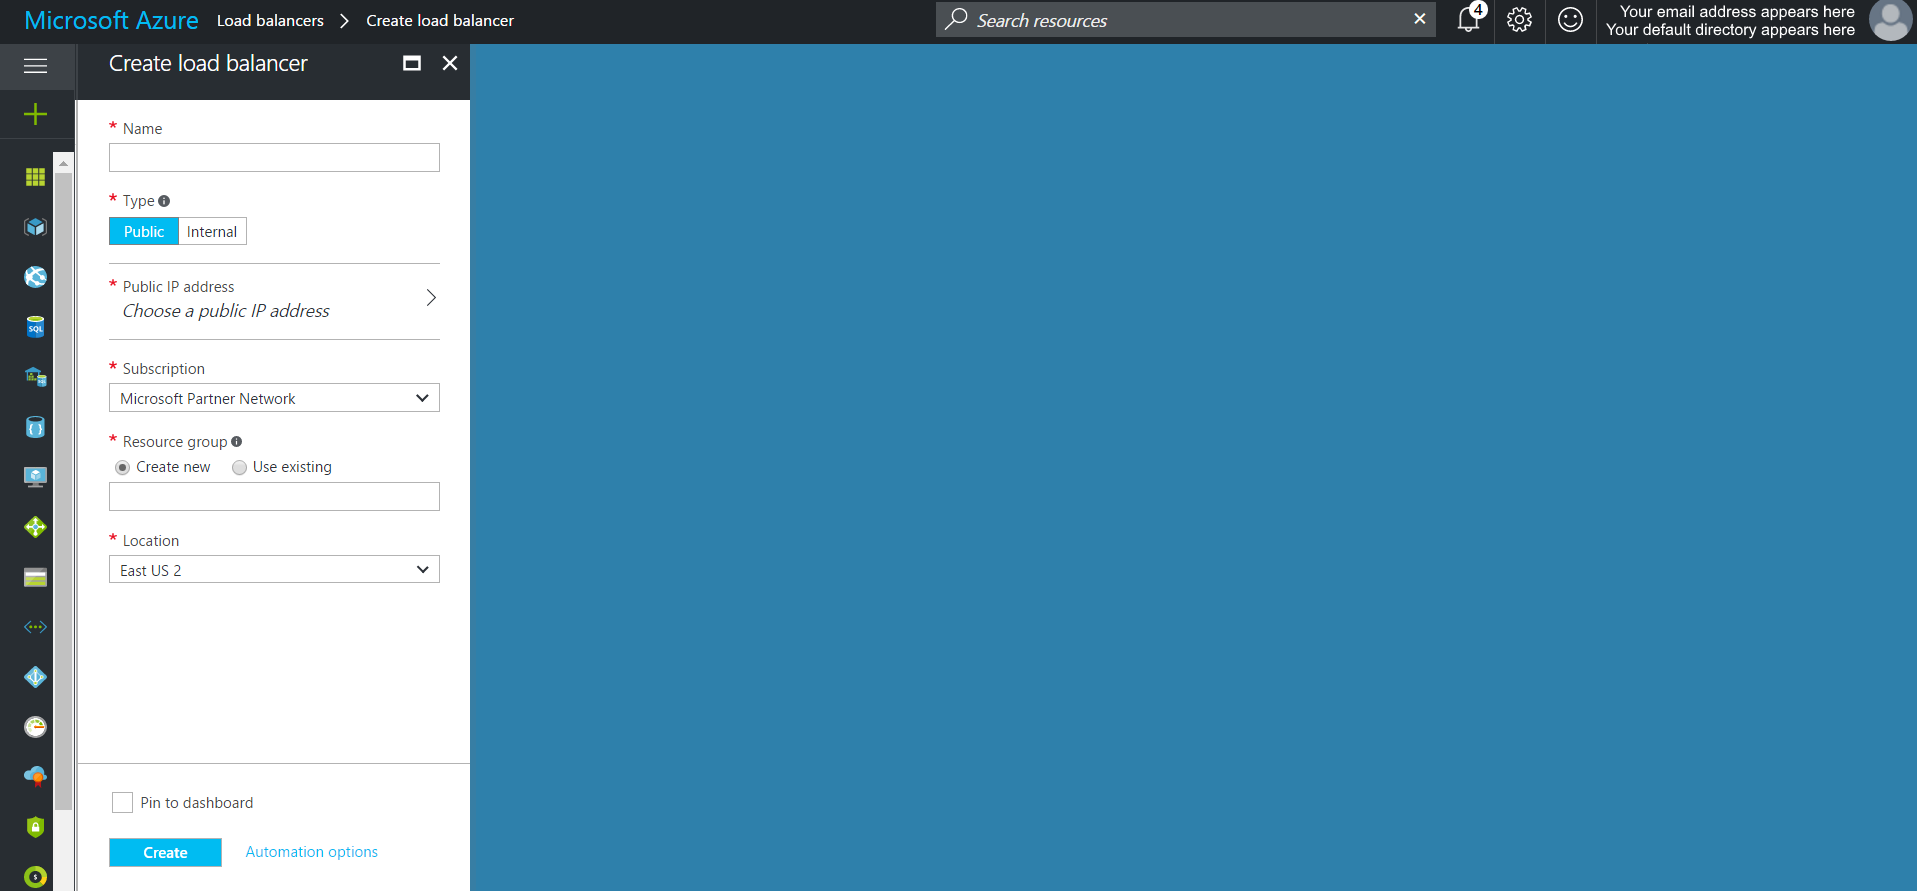
Create the Load Balancer(s).
Provision one of more load balancers by clicking the  menu icon and then selecting the button.
- Associate the Load Balancer to the VM or Availability Set
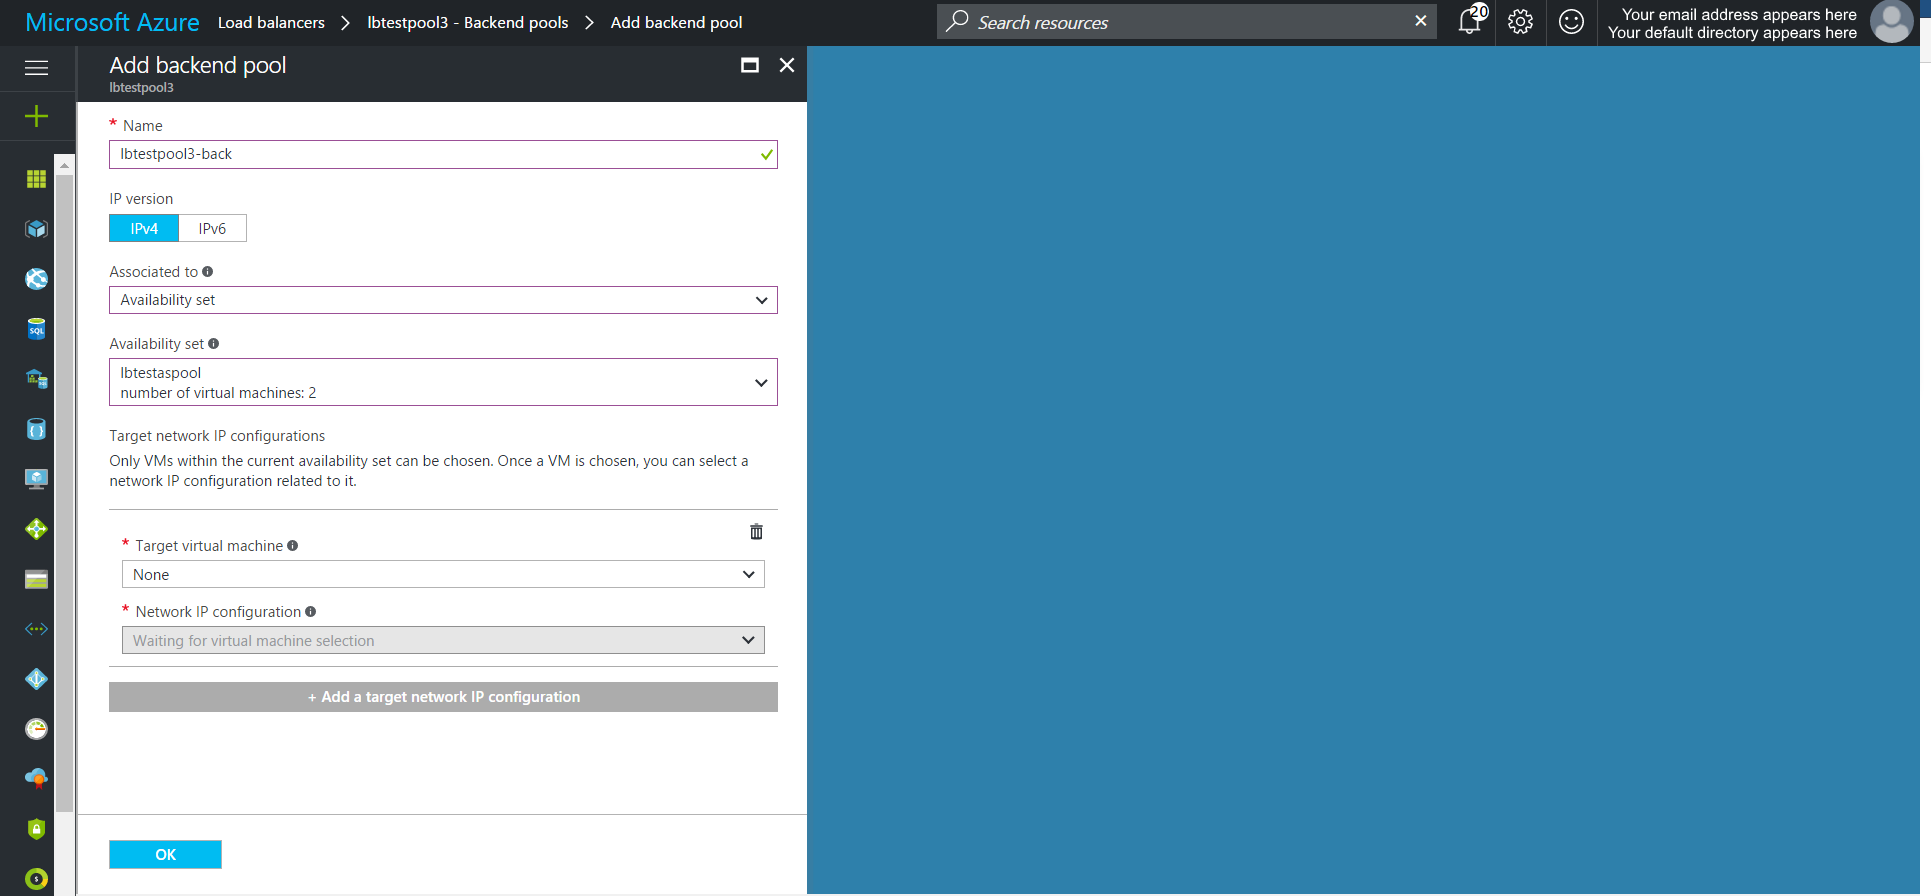
Add a backend pool to the Load Balance and associate to the appropriate machine(s)
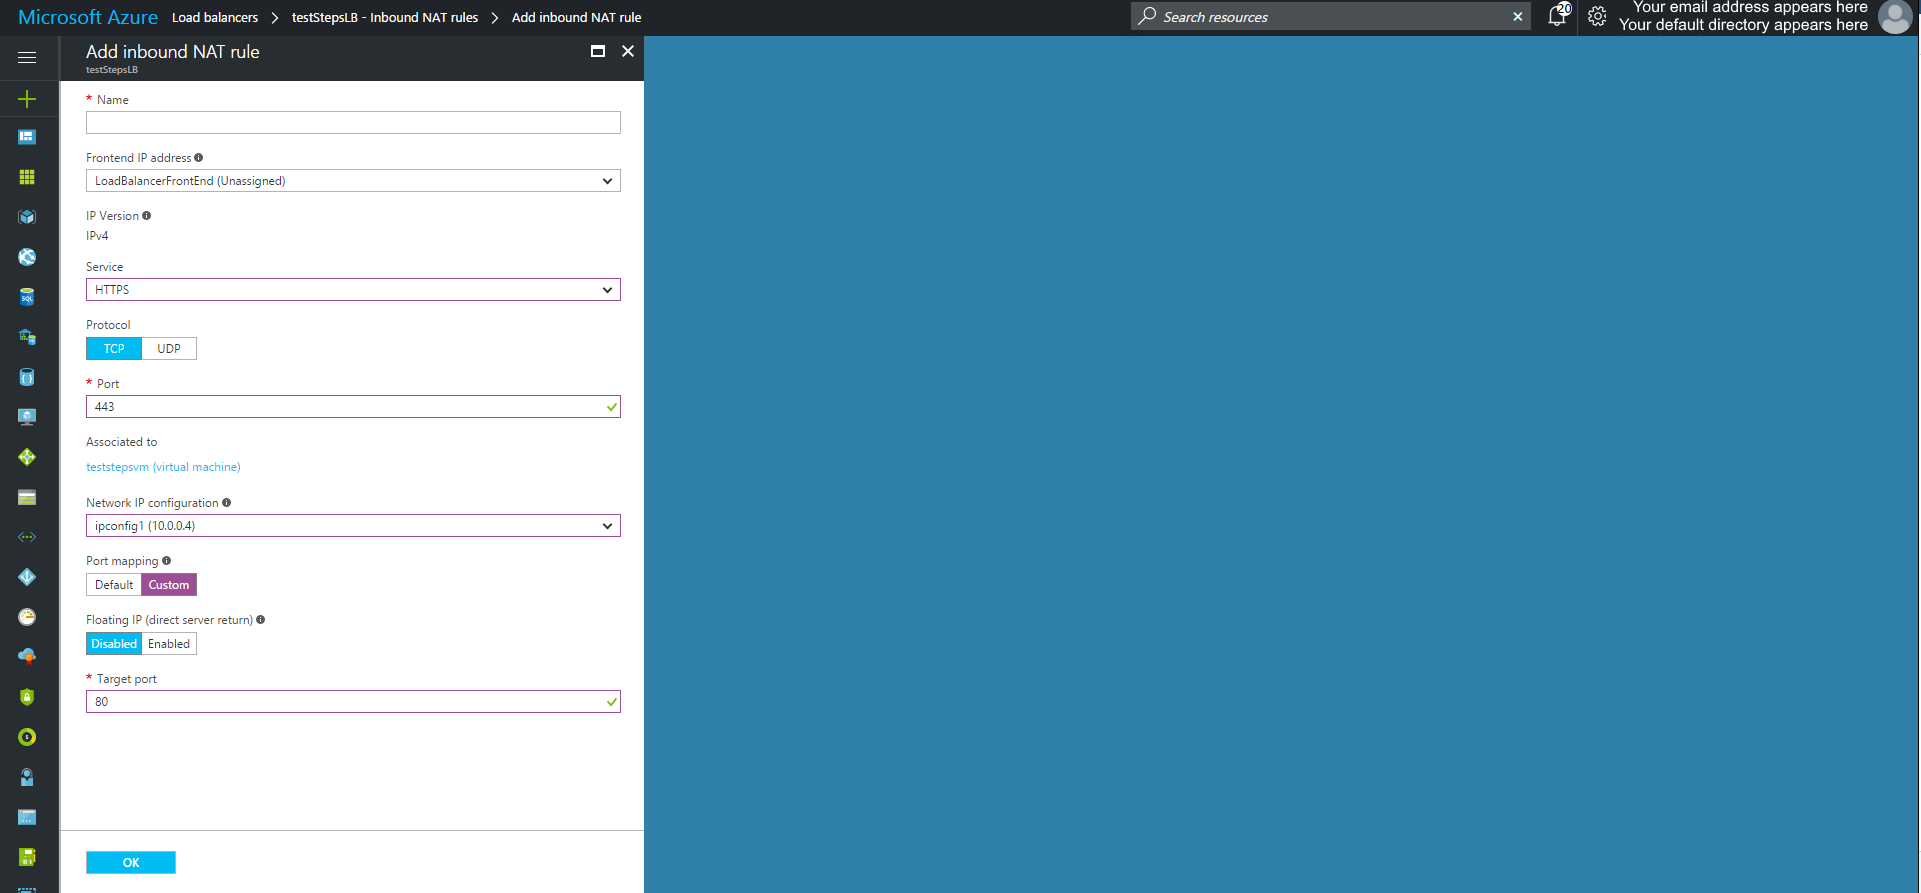
- Add any inbound NAT rules to the Load Balancer
To define the inbound traffic flow, add any required NAT rules.
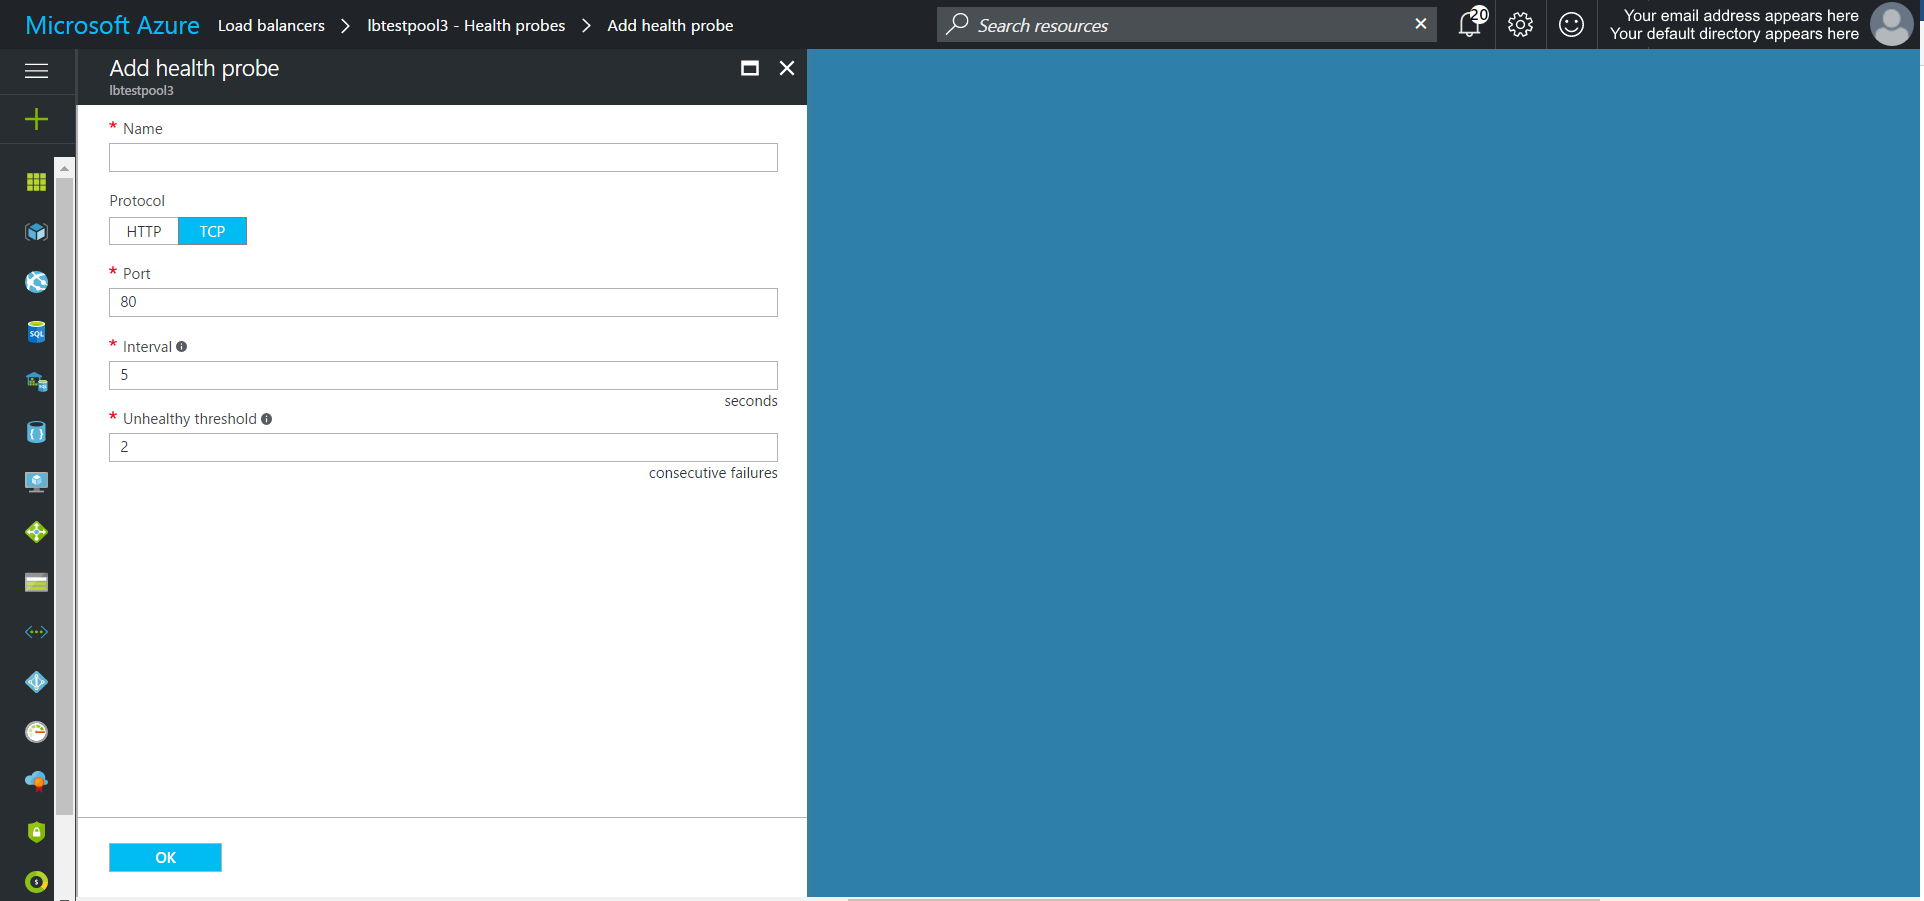
- Add a Health Probe on the appropriate port and or path (http)
The health probe monitors the responsiveness of your underlying server instances. If a health probe fails to respond after the threshold attempts have been surpassed, the Load Balancer will stop sending new connections to that server instance. HTTPS is not supported for probes.
- Add a backend pool to the Load Balancer
The backend pool can be associated to a single VM or an availability set. When associating to an availability set be sure to add the network IP configuration for each VM within the set.
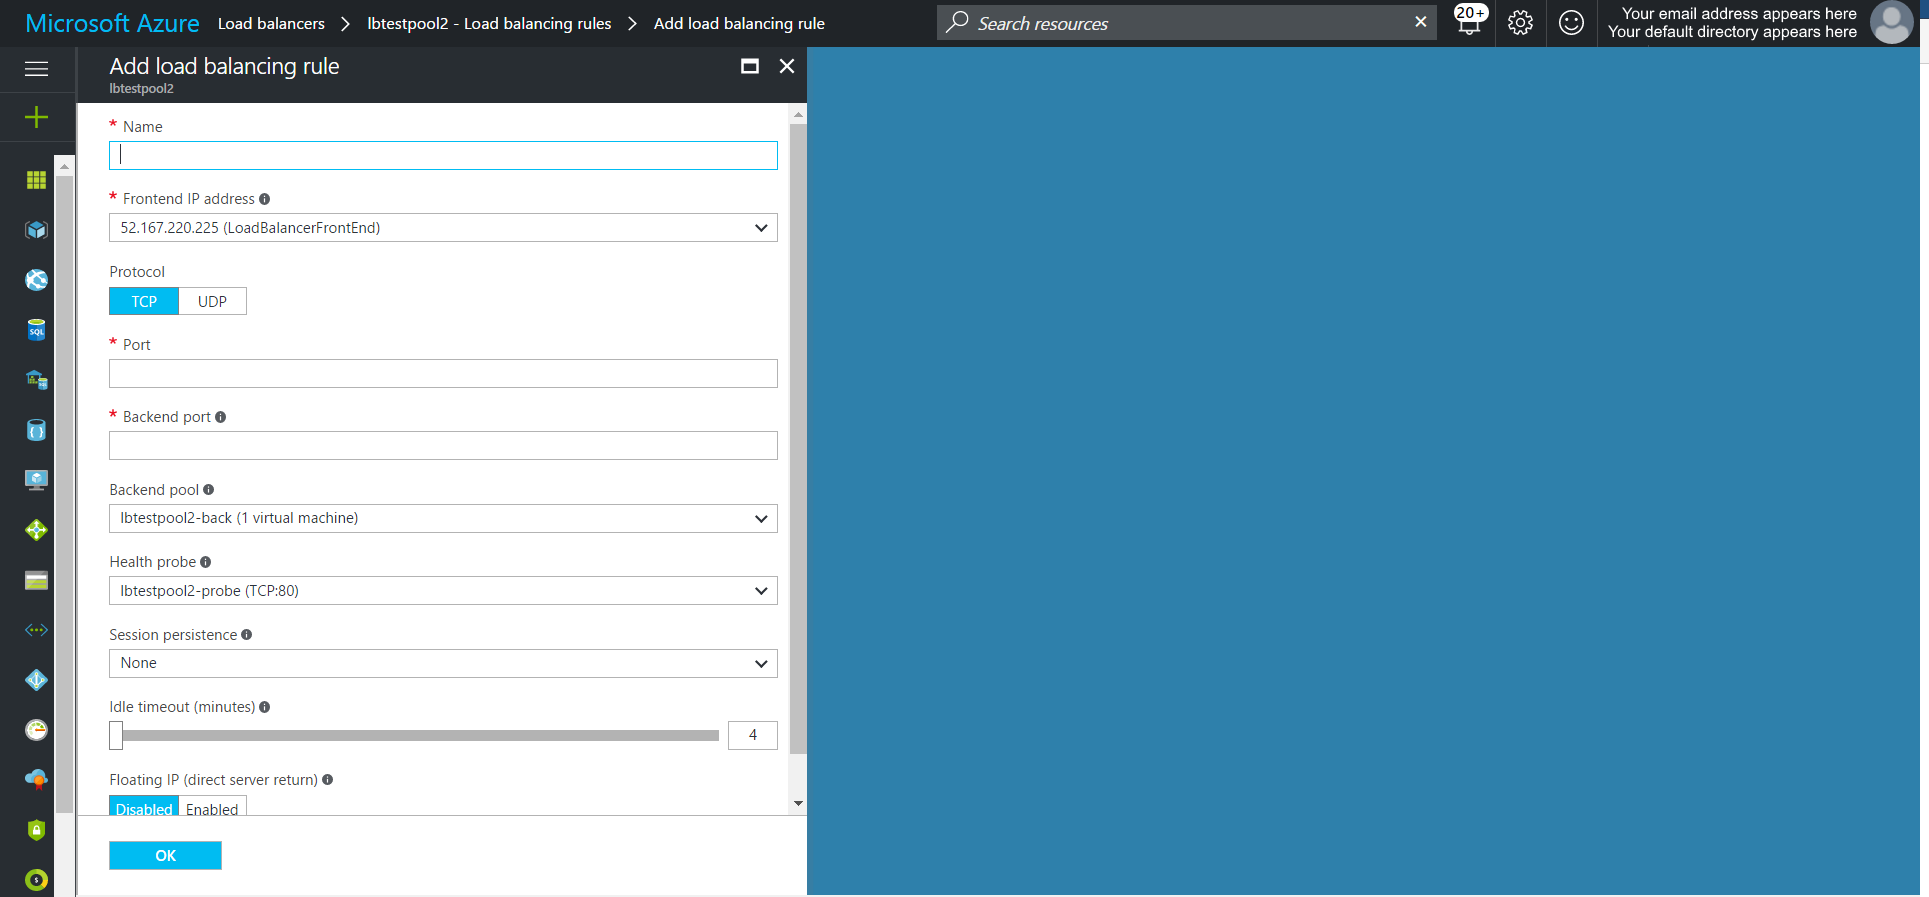
- Add Routing Rule to the Load Balancer
After successfully saving the Backend Pool and Health Probe you can proceed to setup the rule that routes traffic from the Load Balancer to the VM(s) in the network.
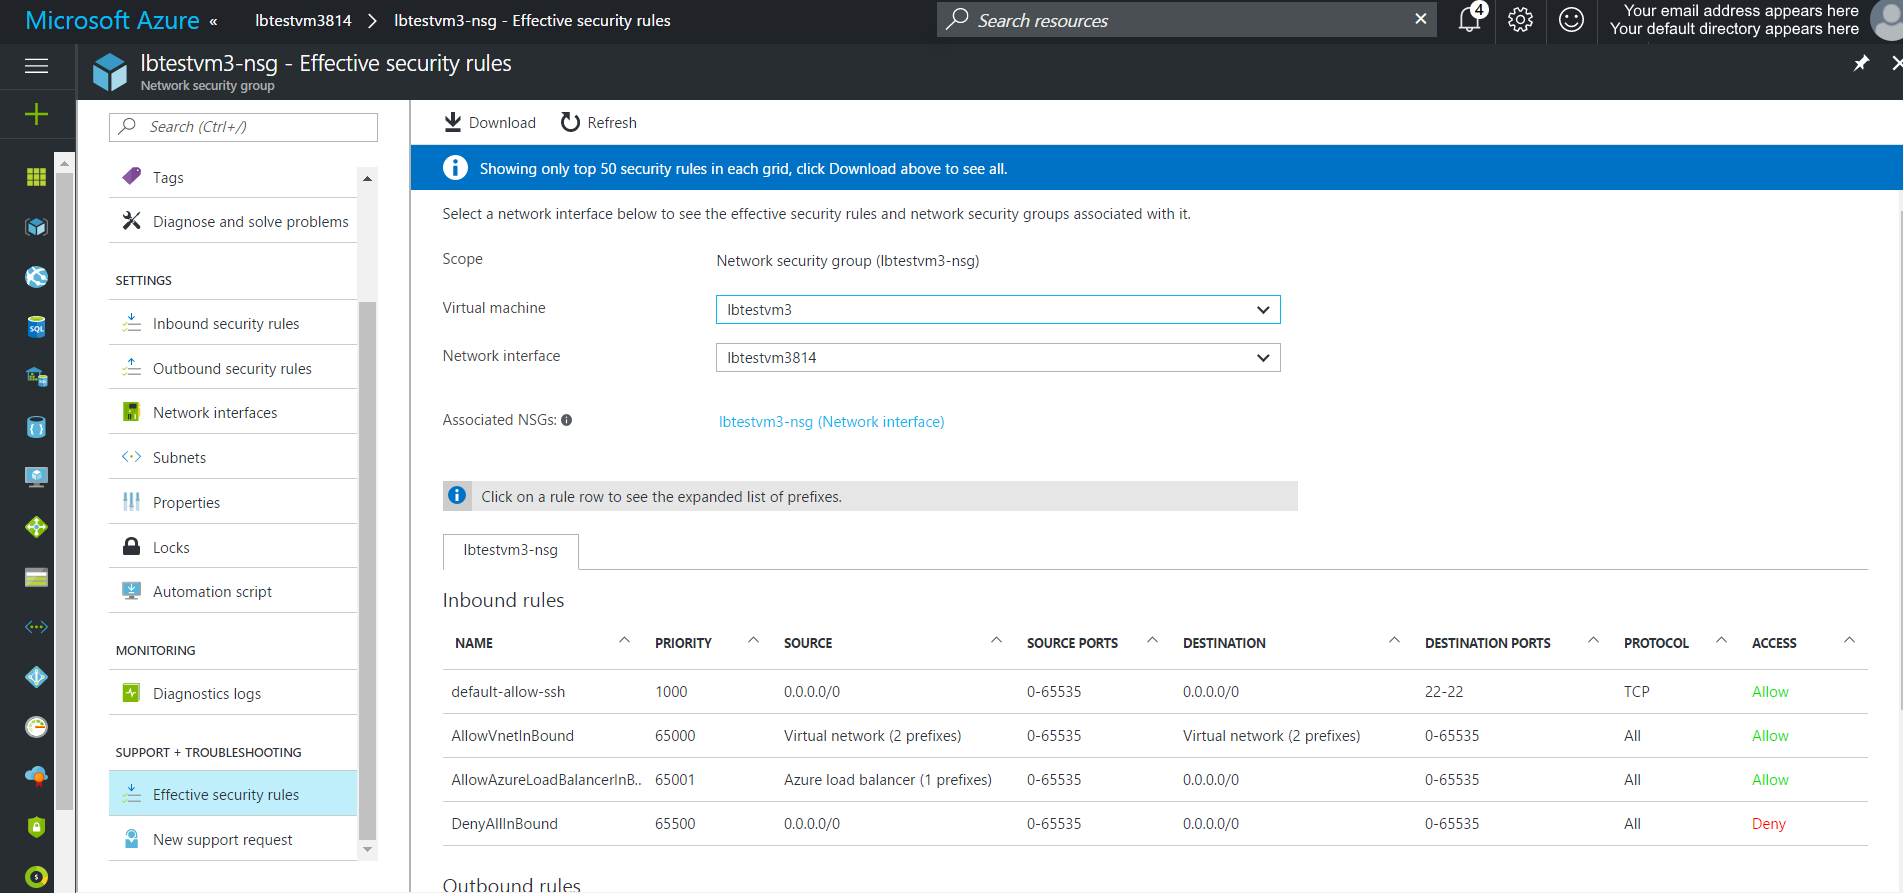
- Open port(s) on the VM
For any NAT rules or rules defined on the Load Balancer, you need to open those ports on the VM. By default, only port 22 is open for the purposes of SSH. To open a port on the VM, you need to update the associated Network Security Group. To open the corresponding NSG, open the VM, then click Network interfaces and select the NIC from the list that appears on the right. When the network inteface window opens, one of the properties will be Network security group. Click on the name and then you can view which rules have been setup.
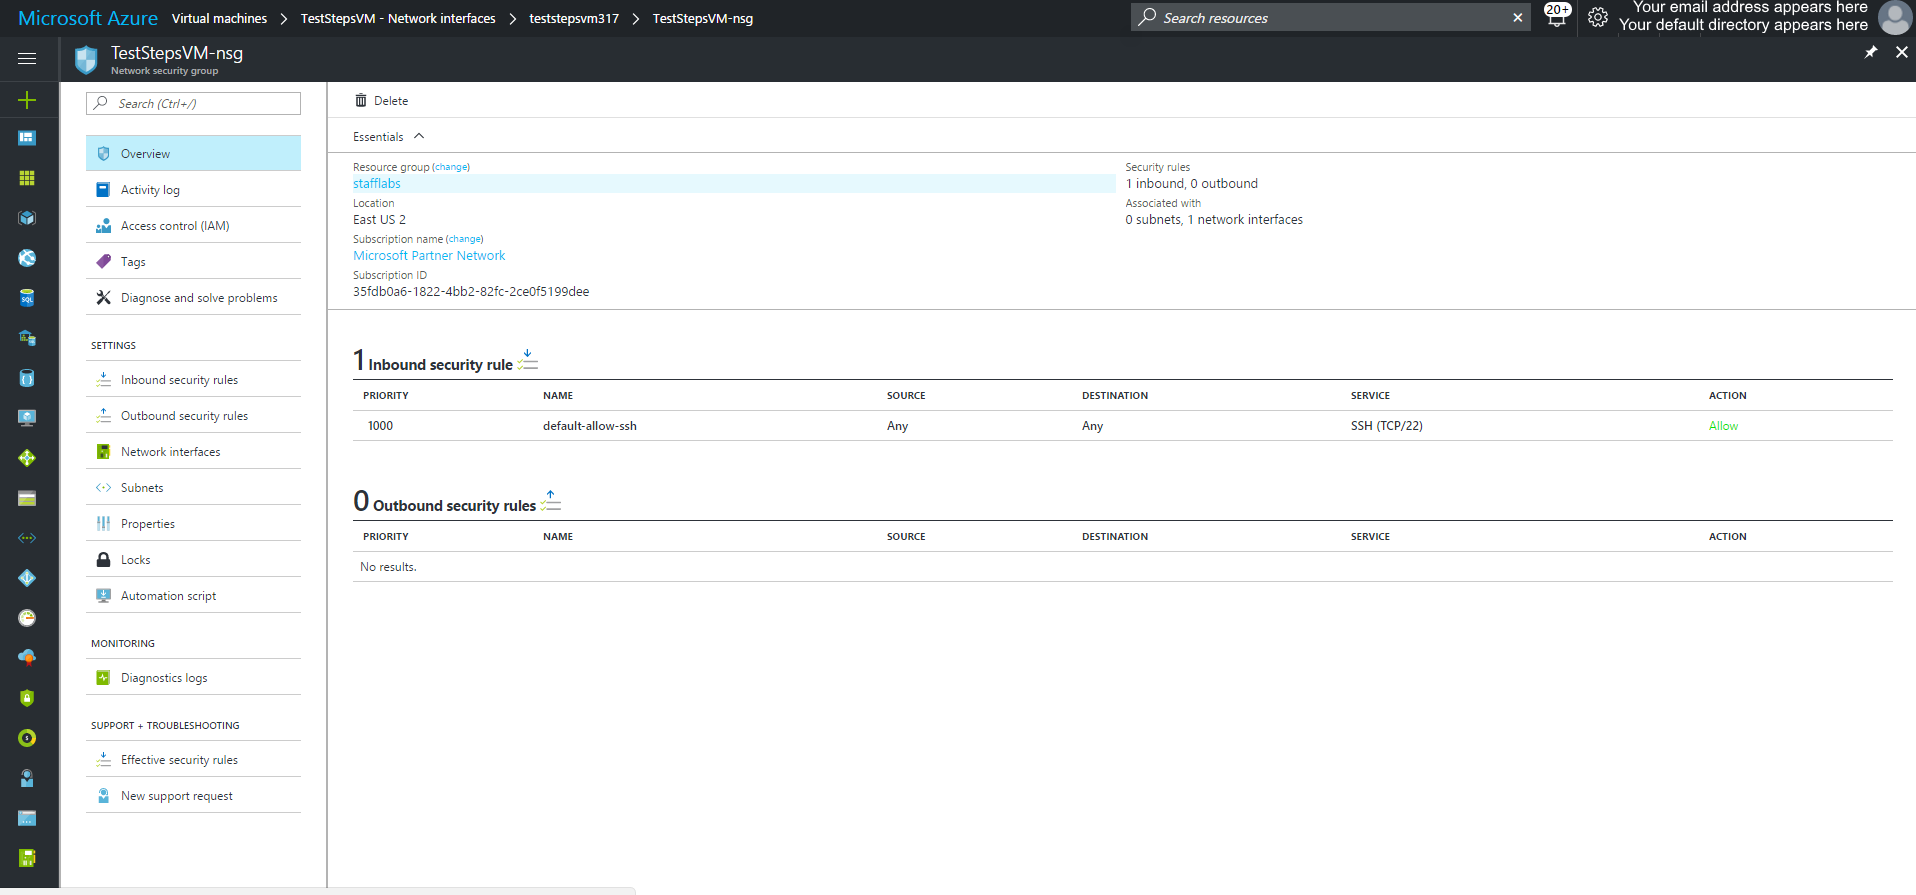
To add a inbound, click Inbound security rules

Using Azure Powershell
Login to your Azure subscription
Connect to your Azure account and ensure you are connected to the correct subscription.
# To log in to Azure Resource Manager (use TenantID switch for faster log in)
Login-AzureRmAccount [-TenantID xxxxxxxxx]

# To view all subscriptions tied to your account
Get-AzureRmSubscription

# To switch subscriptions
Get-AzureRmSubscription -SubscriptionName "{SubscriptionName}" | Select-AzureRmSubscription
Create a Resource Group
If a Resource Group does not exist or you wish to use a new group, using the following script to create one:
#Create a Resource Group
New-AzureRmResourceGroup -Name "{ResourceGroupName}" -Location "{Location}"
Create Availability Set(s) [Optional]
If you are creating more than one virtual machine (or more correctly, deploying an application with more than one tier) it may be advantageous to create availability sets. The purpose of availability sets is that the Azure platform has no way of distinguishing the application tiers associated with each VM. This could lead to a single point of failure across your entire application. When a VM is added to an availability set, by default Azure assigns it to two Fault Domains and five Update Domains. The VMs are allocated across these domains to ensure that not all VMs within a set will fail together. It is important to note that availability sets that contain only a single VM are not subjects to Azure's SLA. More information on availability sets can be found here.
# Ensure you have AzureRm.Compute module is installed
# To view installed modules
Get-Module

# To list all modules
#Get-Module -ListAvailable

# If AzureRmCompute is not installed, go ahead and install it
#Install-Module AzureRM.Compute

# Create an availability set; use the managed switch if you are using a managed disk
$availset = New-AzureRmAvailabilitySet -ResourceGroupName "{ResourceGroupName}" -Name "{AvailabilitySetName}" -Location "{Location}" [-managed]
Create Network Resources
Unlike in Azure Portal where network resources are created during the VM setup, in Powershell, they must be explicitly instantiated beforehand and then assigned to the VM you are creating. There are a number of limitations per subscription in Azure. For more information see Networking Limits.
# Create a subnet configuration (Note: you can create more than one subnet in your VN)
$subnetConfig = New-AzureRmVirtualNetworkSubnetConfig -Name "{Name}" -AddressPrefix "{IPAddressRange}"

# Create a virtual network (multiple subnets can be added using a comma-delimited list)
$vnet = New-AzureRmVirtualNetwork -ResourceGroupName "{ResourceGroupName}" -Location "{Location}" -Name "{Name}" -AddressPrefix "{IPAddressRange}" -Subnet $subnetConfig

# (Optional) Create a public IP address and specify a DNS name (you may concatenate the $(Get-Random) function to the Name for uniqueness
# This step is optional and only necessary if you require public access to your VM
$pip = New-AzureRmPublicIpAddress -ResourceGroupName "{ResourceGroupName}" -Location "{Location}" -AllocationMethod {Static|Dynamic} -IdleTimeoutInMinutes "{N}" -Name "{Name}"

# Create IP configuration(s)
# When assigning multiple IP configurations, one configuration must be assigned as primary
# To test whether an IP Address is available in your virtual network use the following:
# Test-AzureRmNetworkInterfaceIpConfig -IPAddress "{IPAddress}" -VirtualNetwork "{VirtualNetwork}"
$IPAddress = "{IPAddress}"
# You can reference subnets be index number of by name using $vnet.Subnets|?{$_.Name -eq "{SubnetName}"}
$IPConfig = New-AzureRmNetworkInterfaceIpConfig -Name "{Name}" -Subnet $vnet.Subnets[0] -PrivateIpAddress $IPAddress [-PublicIpAddress $pip] -Primary

# Create any number of security rules
# The example below allows inbound access on port 3389 for RDP connections
$nsgRuleRDP = New-AzureRmNetworkSecurityRuleConfig -Name "{Name}" -Protocol TCP -Direction Inbound -Priority 1000 -SourceAddressPrefix * -SourcePortRange * -DestinationAddressPrefix * -DestinationPortRange 3389 -Access Allow

# Create a network security group and assign the rules (multiple rules can be added using a comma-delimited string)
$nsg = New-AzureRmNetworkSecurityGroup -ResourceGroupName "{ResourceGroupName}" -Location "{Location}" -Name "{Name}" -SecurityRules $nsgRuleRDP

# Create a network interface card and associate with the IP configurations (multiple configurations can be added using a comma-delimited list)
$nic = New-AzureRmNetworkInterface -Name "{Name}" -ResourceGroupName "{ResourceGroupName}" -Location "{Location}" -IpConfiguration $IPConfig -NetworkSecurityGroupId $nsg.Id
Create the Virtual Machine(s)
# Getting/Setting the storage account is optional.  If not specified, Azure will automatically provision a new storage account
# Get an existing storage account
$sta = Get-AzureRmStorageAccount -ResourceGroupName "{ResourceGroupName}" -Name "{Name}"
# Create a new storage account
#$sta = New-AzureRmStorageAccount -ResourceGroupName "{ResourceGroupName}" -Name "{Name}"  –SkuName "{SkuName}" -Location "{Location}"

# Define a credential object
$cred = Get-Credential

# Create a virtual machine configuration
$vmConfig = New-AzureRmVMConfig -VMName "{VMName}" -VMSize "{VMSize}" -AvailabilitySetId $availset.Id |
Set-AzureRmVMOperatingSystem -Linux|-Windows -ComputerName "{VMName}" -Credential $cred |
Set-AzureRmVMSourceImage -PublisherName "{PublisherName}" -Offer "{Offer}" -Skus "{Sku}" -Version latest |
Add-AzureRmVMNetworkInterface -Id $nic.Id

# (skip if you want Azure to provision this automatically) Set boot diagnostics (the storage account cannot be a premium storage account)
#Set-AzureRmVMBootDiagnostics -VM $vmConfig -Enable -ResourceGroupName "{ResourceGroupName}" -StorageAccountName "{StorageAccountName}"
# (or disable boot diagnostics - enabled by default)
#Set-AzureRmVMBootDiagnostics -VM $vmConfig -Disable

# Set the virtual machine disk (you can add multiple disks; use the CreateOption ATTACH if using a pre-existing disks)
$osDiskUri = $STA.PrimaryEndpoints.Blob.ToString() + "vhds/" + "{Name}" + ".vhd"
Set-AzureRmVMOSDisk -VM $vmConfig -VhdUri $osDiskUri -Name "{Name}" -CreateOption {FromImage|Attach|Empty} -Caching {ReadWrite|ReadOnly|None}

# Create the VM
New-AzureRMVM -ResourceGroupName "{ResourceGroupName}" -Location "{Location}" -VM $vmConfig
Create the Load Balancer(s)
# Create the public IP address for the LB
$pipLB = New-AzureRmPublicIpAddress -ResourceGroupName "{ResourceGroupName}" -Name "{IPName}" -Location "{Location}" -AllocationMethod {Static|Dynamic} -DomainNameLabel {"Label"}

# Add the new IP to the front end pool
$frontendIP = New-AzureRmLoadBalancerFrontEndIpConfig -Name "{Name}" -PublicIpAddressId $pipLB.Id

# Create a backend pool
$bepool = New-AzureRmLoadBalancerBackendAddressPoolConfig -Name "{Name}"

# Setup any initial NAT rule(s)
$inNatRule1 = New-AzureRmLoadBalancerInboundNatRuleConfig -Name "{Name}" -FrontendIpConfiguration $frontendIP -Protocol {TCP|UDP} -FrontendPort "{nnnn}" -BackendPort "{nnnn}"

# Create any health probe(s)
$hProbe1 = New-AzureRmLoadBalancerProbeConfig -Name "{Name}" -Protocol TCP -Port "{nnnn}" -IntervalInSeconds "{nn}" -ProbeCount "{n}"
# HTTP probes have a slightly different notation
#$httpProbe1 = New-AzureLoadBalancerProbeConfig -Name "{Name}" -Protocol http -RequestPath "{RelativeUrl}" -Port "{nnnn}" -IntervalInSeconds "{nn}" -ProbeCount "{n}"

# Create load balancer rule(s)
$lbrule1 = New-AzureRmLoadBalancerRuleConfig -Name "{Name}" -FrontendIpConfiguration $frontendIP -BackendAddressPool $bepool -Probe $hProbe1 -Protocol {TCP|HTTP} -FrontendPort "{nnnn}" -BackendPort "{nnnn}"

# Create the load balancer (multiple rules can be added using a comma-delimited string
$newLB = New-AzureRmLoadBalancer -ResourceGroupName "{ResourceGroupName}" -Name "{Name}" -Location "{Location}" -FrontendIpConfiguration $frontendIP -InboundNatRule $inNatRule1 -LoadBalancingRule $lbrule1 -BackendAddressPool $bepool -Probe $hProbe1

# Additional NAT Rules can be added to the LB after initialization using the following (the same pattern can be used to add probes and LB rules)
#$inNatRule2 = New-AzureRmLoadBalancerInboundNatRuleConfig -Name "{Name}" -FrontendIpConfiguration $frontendIP -Protocol "TCP|UDP" -FrontendPort "{nnnn}" -BackendPort "{nnnn}"
#$newLB | Add-AzureRmLoadBalancerInboundNatRuleConfig $inNatRule2
Associate the Load Balancer rule with the appropriate NIC
# Associate the NIC
# If you need to get reinstantiate the pointer to the NIC card you previously created, use the following:
# $nic = Get-AzureRmNetworkInterface -ResourceGroupName "{ResourceGroupName}" -Name "{Name}"
# You can reference IP Configurations by index or by name using $nic.IpConfigurations|?{$_.Name -eq "{IpConfigName}"}
$nic.IpConfigurations[0].LoadBalancerInboundNatRules.Add($newLB.InboundNatRules[0])
$nic | Set-AzureRmNetworkInterface


# You can also associate the NIC to a backend pool as follows:
$nic.IpConfigurations[0].LoadBalancerBackendAddressPools.Add($newLB.BackendAddressPools[0])
$nic | Set-AzureRmNetworkInterface
Ensure that any backend port(s) defined in the NAT rules or rules on the associated Load Balance are open on the VM. By default, only port 22 is open. You may have already done this when setting up the initial rules in step 4, in which case you can skip this step.
# Adding a security rule to and existing security group
# Create the security rule
$nsgRuleXXX = New-AzureRmNetworkSecurityRuleConfig -Name "{Name}" -Protocol {TCP|UDP|*} -Direction {Inbound|Outbound} -Priority 1000 -SourceAddressPrefix * -SourcePortRange * -DestinationAddressPrefix * -DestinationPortRange "{Port(s)}" -Access Allow


# Add the rule to the appropriate NSG
$nsg | Add-AzureRmNetworkSecurityRuleConfig $nsgRuleXXX
$nsg | Set-AzureRmNetworkSecurityGroup
Multiple NICs on a single VM
blah blah blah
Related articles
PS C:\> Set-AzureRmVMBootDiagnostics -VM $VM -Enable -ResourceGroupName "ResourceGroup11" -StorageAccountName "DiagnosticStorage"