This article will cover setting up network interface configurations for virtual machines (VMs) and corresponding load balancers (LBs) within your Azure subscription. Before we begin, it is important to distinguish the important disparities between networking in Azure V1 (Classic) and Azure V2 (Resource Manager). This article will focus solely on the latter.
Azure V1 (Classic)
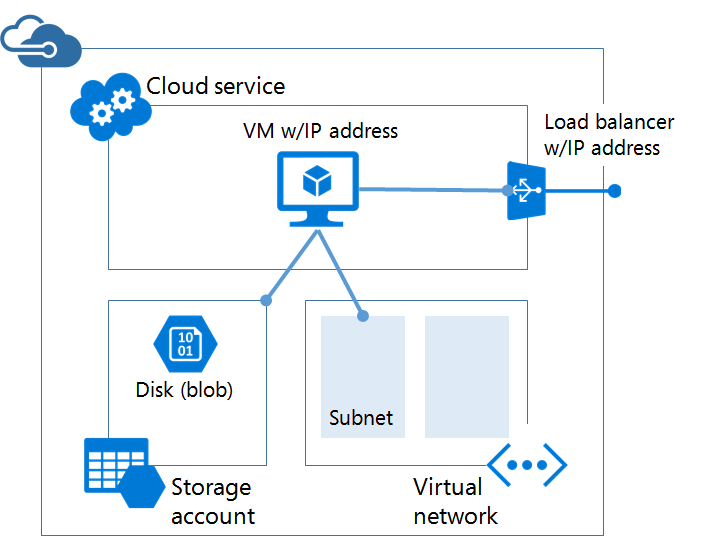
The old way of doing networking in the classic management portal was to wrap everything up in an abstraction known as the cloud service. The cloud service itself had a public IP address and then NAT rules would be created, using an endpoint, that opened a UDP or TCP port to the public using the cloud service's public IP address. Load balancing was achieved by simply duplicating an endpoint across two or more virtual machines. Virtual machines themselves could be connected to Internet with a public IP address, but these machines could not be load balanced. Effectively your network would look like this:
Azure V2 (Resource Manager)
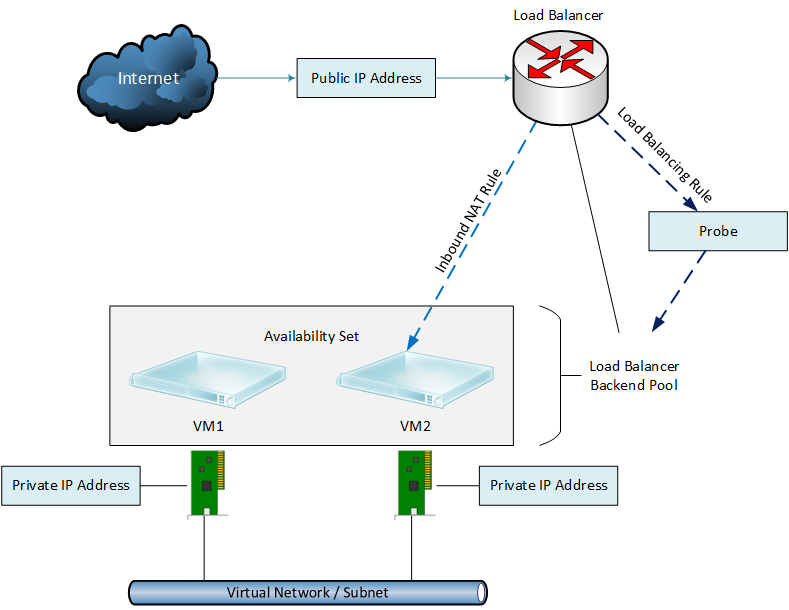
Things have changed significantly since the inception of ARM. Cloud service and endpoints have been eradicated. Instead a virtual network (VN) is designed with one or more subnets. For each virtual machine, a NIC is created and connected to a subnet in the VN and assigned an IP address within that subnet. Network security groups can be assigned to allow/deny traffic. As in classic mode, virtual machines are assigned a public IP address to expose it to the Internet. However, load balancing is no longer inherent in the network, instead they are separately provisioned.
It is important to note that an ARM load balancer is not a VM nor a network appliance but rather a function within the Network Resource Provider. A backend pool is configured within the load balancer and then associated to one or more virtual machines or to an availability set. A load balancer can only be associated to one availability set but you can create more than one backend pool from a single availability set and a VM can reside in more than one backend pool. The Azure network using Resource Manager looks like this:
Networking guide
While we will be outlining the basic steps to configure a typical LB/VM setup within your Virtual network, we will be also discussing three additional permutations for reference. These variations are:
- Multiple NICs on a single VM
- Multiple Public IPs on a single VM
- Multiple Public IPs on a single LB
Creating Your Virtual Network
To begin, we will start with the most basic configuration, which is the VMs setup with a single NIC instance. Essentially when you complete the steps below you will have a network resembling the following:
...
| Anchor | ||||
|---|---|---|---|---|
|
blah blah blah
Related articles
| Content by Label | ||||||||||||||||||
|---|---|---|---|---|---|---|---|---|---|---|---|---|---|---|---|---|---|---|
|
...