Dont' follow this artcile yet. I got to clean it up.
Introduction
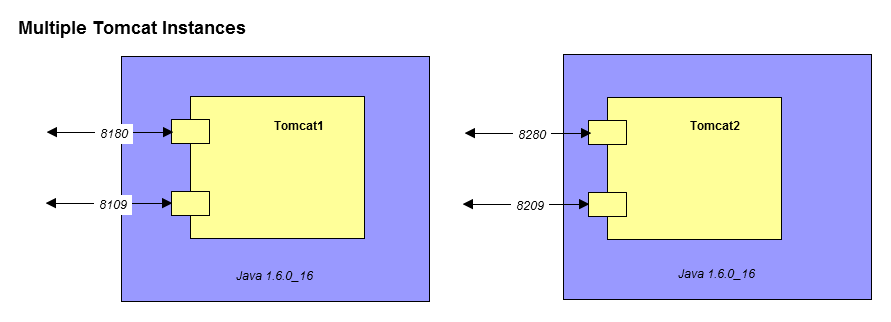
This is a continution of the Bonsai Framework 0FS Tomcat setup and explains how to scale vertically (article can be written of why vertical is better than just increasing heap size) adding two additional instances of Tomcat on the same machine,
- 0FS Tomcat Instance 1 on Java 1.6.0_16 run by user serveradmin
- 0FS Tomcat Instance 2 on Java 1.6.0_16 run by user serveradmin
You may also opt to further mix and match with different versions of Tomcat and Java.
Here is a diagram of what we will be building,
Download
Download the Bonsai Framework pre-packaged 0FS Tomcat setup.
Install by unzipping with a staff sudo enabled account,
wget http://www.bonsaiframework.com/downloads/0fs-tomcat-linux/0fs-tomcat.tar.gz # this symbolically points to the latest 64-bit version
sudo tar -xvpf 0fs-tomcat.tar.gz # sudo will ensure the permissions and users are kept
sudo mv /0fs-tomcat/ /0fs-tomcat.1/
sudo mv /0fs-tomcat.1/ /opt/
Now create the second instance,
...
Tomcat and serveradmin
I will re-iterated that you should run Tomcat or any public facing service for that matter as serveradmin. As noted in account creation, this is for security reasons. In the event that Tomcat is somehow attacked, the compromise would be limited to serveradmin which has reduced limited priviledges.
Further to this, using a central account ensures consistency.
For audit purposes, make sure to log in with your own staff id first and then sudo into serveradmin for managing Tomcat. In true Cloud world where everything works as a recipe, use your recipes to make Tomcat adjustments.
Directory Structure
The directory structure will be as follows,
/opt/apache - root directory for Tomcat and any other Apache products
/opt/apache/tomcat.1 - directory for Tomcat1 running on port 8180
/opt/apache/tomcat.1/java - directory we will place java for Tomcat1
/opt/apache/tomcat.2 - directory for Tomcat2
/opt/apache/tomcat.2/java - directory we will place java for Tomcat2 running on port 8280
First step, create the apache directory under opt,
su - bhitch # We need a staff user who can sudo
cd /opt
sudo mkdir apache
sudo chown -R serveradmin:staff ./apache # Make sure serveradmin can use the folder.
Manually Setup JRE
Use the account that will be launching the Java process. In this example it will be serveradmin,
su - serveradmin # If you are not already serveradmin
cd ~
wget --no-check-certificate --no-cookies --header "Cookie: oraclelicense=accept-securebackup-cookie" http://download.oracle.com/otn/java/jdk/7u7-b10/jre-7u7-linux-x64.tar.gz
The steps for JRE and JDK are both the same. Here is an example of a JRE setup,
su - serveradmin # If you are not already serveradmin
cd ~ # Switch to the serveradmin home directory
tar -xvpf jre-7u7-linux-x64.tar.gz
The result will be an uncompressed jre directory using the same name as the package. In this example the folder name would be, jre-7u7-linux-x64.
If you plan to use multiple versions of Java, we recommend keeping the folder name with the version number information and using symbolic links. If you are only using one version of Java, then simply rename the folder.
For the server example, we will rename the folder,
mv jre-7u7-linux-x64 java
You may be interested in how to Zero Footprint Java on Windows.
Leave the setup Java folder alone for now. It will be moved into the Tomcat folder as part of the Tomcat setup.
Manually Setup Tomcat
By manually setting up Tomcat there is much more control and you can run multiple tomcat instances. Download tomcat. The tar.gz file is used because permissions are already setup such as execute for startup.sh. A zip file will lose the permissions.
Go to the Apache Tomcat download site.
su - serveradmin
cd ~
tar -xvpf apache-tomcat-6.0.20.tar.gz # All the permissions will be kept
mv ./apache-tomcat-6.0.20/ ./tomcat.1/ # This will be Tomcat1
exit # Switch back to your staff account
Next move the extracted Java folder into your tomcat folder,
mv ./java/ ./tomcat.1/
Log in as your staff account which has sudo access to perform the actual move to /opt/
cd /home/serveradmin
sudo mv ./tomcat.1/ /opt/apache/
Finally, if this is a multi-user machine, we secure tomcat from other users and processes. The only users should be serveradmin for read and write and staff for read to debug.
Change the permissions,
cd /opt/apache
sudo chown -R serveradmin:staff ./tomcat.1/
sudo chmod -R o-wrx ./tomcat.1/
At this point, if you wanted to create your own modified 0fs package,
sudo tar -czvf 0fs-tomcat.tar.gz ./0fs-tomcat/
Change Default Ports
Normally it's fine to leave Tomcat on the default port. However, for this exercise we are going learn how to change ports on both instances.
We will change Tomcat1 from the default ports,
- 8005 - for shutdown
- 8009 - for JK Mod
- 8080 - regular port similar to 80
- 8443 - ssl port similar to 443
The new ports will be,
- 8105 - for shutdown
- 8109 - for JK Mod
- 8180 - regular port similar to 80
- 8543 - ssl port similar to 443
The very first step is to verify that the ports for Tomcat1 are not being used.
netstat -an | grep LISTEN | grep 8105
netstat -an | grep LISTEN | grep 8109
netstat -an | grep LISTEN | grep 8180
netstat -an | grep LISTEN | grep 8543
If you get no results then there are no listening ports.
Change Tomcat1 to use use the new ports by editing /opt/tomcat.1/conf/server.xml. Use an editor to search and replace or more quickly using the following sed commands to do modify your file,
cd /opt/apache/tomcat.1/conf/
sed -i 's/8005/8105/' server.xml
sed -i 's/8009/8109/' server.xml
sed -i 's/8080/8180/' server.xml
sed -i 's/8443/8543/' server.xml
Fix Tomcat catalina.out Logging
Tomcat Logging has a bug where if catalina.out reaches over ![]() (need to research) logging stops working. Worse if over 2GB Tomcat will not start and also not report any errors. Yes this is pretty crazy that this is not fixed.
(need to research) logging stops working. Worse if over 2GB Tomcat will not start and also not report any errors. Yes this is pretty crazy that this is not fixed.
Ubuntu
Edit the bin/catalina.sh,
cd /opt/apache/tomcat.1/bin/

# For Tomcat 8

# Turns off the creation of the generic file.
sed -i 's/touch "$CATALINA_OUT"/#touch "$CATALINA_OUT"/' catalina.sh

# Uses cronolog to rotate.
sed -i 's/>> "$CATALINA_OUT" 2>&1 "&"/2>&1 |/usr/bin/cronolog "$CATALINA_BASE/logs/catalina-%Y-%m-%d.out" &/' catalina.sh
This solution comes from VMWare who now owns SpringSource. Caveat is that the incorrect process ID being written to the process ID file so I don't like this solution as it will impact shutdown scripts.
Windows
TBC - Research and a solution needs to be found for this.
This article by SpringSource uses cronolog (they know Tomcat so well they created a variation with more Enterprise features looks promising").
Apache Tomcat's position is to not fix in the near future (we disagree as enough restarts will cause the problem with the log file) and the same article also provides some solutions too.
Research
http://java.dzone.com/articles/how-rotate-tomcat-catalinaout?utm_source=am6_feedtweet&utm_medium=twitter&utm_campaign=toya256ForRSS - talks about using logrotate (there is a slice of time where the log stops working). Also has a patch to tomcat so this solution works in Solaris.
Posting at bottom talks about a bug with Bash with logrotate and how to solve - http://java.dzone.com/articles/how-rotate-tomcat-catalinaout
Article by Spring Source using cronolog - http://www.tomcatexpert.com/knowledge-base/rotating-catalinaout-log-files
Naming the Tomcat Process for Solaris (solved)
Solaris' built in ps has a specific limitation of 60 characters. As a result, it is not intuitive to determine which process of tomcat is which when the ps command is executed,
serveradmin 12150 13290   1 11:51:28 pts/2       0:10 /opt/jre1.6.0_16/bin/java -Djava.util.logging.manager=org.apache.juli.ClassLoad
serveradmin  5906 13290   0   Jul 24 ?           6:17 /opt/jre1.6.0_16/bin/java -Djava.util.logging.manager=org.apache.juli.ClassLoad
Notice that the names are exactly the same.
Using the Bonsai Framework method of bundling Java with Tomcat we can tell the differences,
serveradmin 12150 13290   1 11:51:28 pts/2       0:10 /opt/apache/tomcat.1/java -Djava.util.logging.manager=org.apache.juli.ClassLoad
serveradmin  5906 13290   0   Jul 24 ?           6:17 /opt/apache/tomcat.2/java -Djava.util.logging.manager=org.apache.juli.ClassLoad
Only Allow serveradmin to Run Tomcat
Setting up and running Tomcat with serveradmin has the advantage that you can manage the Application server without having to go into root. We want to ensure that only serveradmin starts Tomcat to prevent any issues with permissions. For example, once you start Tomcat1 as root you may find that log files spawned from that startup can no longer be managed by serveradmin. Also, by running Tomcat1s serveradmin rather than root is safer from a security standpoint.
I may have come up with a better strategy where others can not execute and the below script is no longer necessary. hmm.... got to test and ensure root can not override this.
First login as serveradmin. All modification to Tomcat and running of tomcat will happen as serveradmin.
su - serveradmin
Modify Tomcat1's /opt/apache/tomcat.1/bin/startup.sh and opt/apache/tomcat.1/bin/shutdown.sh to only allow serveradmin to start and stop Tomcat.
Do this by adding the block of lines marked with # Bonsaiframework as shown below,
#!/bin/sh

# Bonsaiframework - Modification Start
# --------------------------------------
if [ "$LOGNAME" != "serveradmin" ]; then
echo "This service should only managed with the user serveradmin"
exit 1
fi
# --------------------------------------
# Bonsaiframework - Modification End

# Licensed to the Apache Software Foundation (ASF) under one or more
Run Tomcat with a Specific Java Version Using setenv.sh
Tomcat can be run with a separate version of JRE or JDK that is not the default system version. To do so, you will have to explicitly set the JRE_HOME variable. The JAVA_HOME variable is also configured as some applications will want to make use of this variable instead.
Tomcat has a nice facility for this via a file called setenv.sh which actually does not exist by default. As soon as you create the file, Tomcat will run setenv.sh as part of its startup.
First, let's run the Tomcat diagnostics to see what happens. Because we have no default java and Tomcat does not know about it we should expect a message that we need Java.
su - serveradmin # If you are not already serveradmin.
cd /opt/apache/tomcat.1/bin
./version.sh
Neither the JAVA_HOME nor the JRE_HOME environment variable is defined
At least one of these environment variable is needed to run this program
So now let's create the setenv.sh file. As serveradmin create /opt/apache/tomcat.1/bin/setenv.sh using your favourite editor. Your file contents will look like this,
#!/bin/sh

# Bonsaiframework - Modification Start
# --------------------------------------
JRE_HOME="$CATALINA_HOME"/java
JAVA_HOME="$CATALINA_HOME"/java
# --------------------------------------
# Bonsaiframework - Modification End
The $CATALINA_HOME is a script variable that is established by Tomcat to set the directory it is running from.
Now when you use version.sh you will see the following results,
./version.sh
Using CATALINA_BASE:   /opt/apache/tomcat.1
Using CATALINA_HOME:   /opt/apache/tomcat.1
Using CATALINA_TMPDIR: /opt/apache/tomcat.1/temp
Using JRE_HOME:       /opt/apache/tomcat.1/java
Server version: Apache Tomcat/6.0.20
Server built:   May 14 2009 01:13:50
Server number:  6.0.20.0
OS Name:        Linux
OS Version:     2.6.31-302-rs
Architecture:   amd64
JVM Version:    1.6.0_16-b01
JVM Vendor:     Sun Microsystems Inc.
Using this method, you can have different Tomcat instances running different versions of Java and control when you want to move between Java versions.
Setup Tomcat2
In this example we are going to run with 2 instances of tomcat where we will load balance between them. So we duplicate the tomcat directory with a slightly different directory name,
cd /opt
sudo cp -a ./apache/tomcat.1/ ./apache/tomcat.2/ # This will be Tomcat2
Leave Tomcat1 on the ports,
- 8105 - for shutdown
- 8109 - for JK Mod
- 8180 - regular port similar to 80
- 8543 - ssl port similar to 443
Tomcat2 will use the following ports,
- 8205 - for shutdown
- 8209 - for JK Mod
- 8280 - regular port similar to 80
- 8643 - ssl port similar to 443
The very first step is to verify that the ports for Tomcat2 are not being used.
netstat -an | grep LISTEN | grep 8205
netstat -an | grep LISTEN | grep 8209
netstat -an | grep LISTEN | grep 8280
netstat -an | grep LISTEN | grep 8643
If you get no results then there are no listening ports.
Change Tomcat2 to use use the new ports by editing /opt/tomcat.2/conf/server.xml. Use an editor to search and replace or more quickly using the following sed commands to do modify your file,
cd /opt/apache/tomcat.2/conf
sed -i 's/8105/8205/' server.xml
sed -i 's/8109/8209/' server.xml
sed -i 's/8180/8280/' server.xml
sed -i 's/8543/8643/' server.xml
Verify
Finally startup your Tomcat instances and verify that they are listening,
su - serveradmin

cd /opt/apache/tomcat.1/bin/
./startup.sh
cd /opt/apache/tomcat.2/bin/
./startup.sh

netstat -an | grep LISTEN
tcp        0      0 0.0.0.0:22              0.0.0.0:*               LISTEN
tcp6       0      0 127.0.0.1:8105          :::*                    LISTEN
tcp6       0      0 :::8109                 :::*                    LISTEN
tcp6       0      0 :::8180                 :::*                    LISTEN
tcp6       0      0 :::80                   :::*                    LISTEN
tcp6       0      0 :::22                   :::*                    LISTEN
unix  2      [ ACC ]     STREAM     LISTENING     7376     @/com/ubuntu/upstart
unix  2      [ ACC ]     STREAM     LISTENING     11434    /var/run/fail2ban/fail2ban.sock
unix  2      [ ACC ]     STREAM     LISTENING     21228    /var/run/apache2/cgisock.4973
Notice that here we have started Tomcat1 and it is listening on port 8109 and 8180.
Tomcat by default will have a sample application installed and running.
If you have a firewall setup do not forget to open the ports for testing and then close them afterwards if you plan to front with the Apache Web Server.
If your server has a web browser you can load the examples page using http://localhost:8180/examples/. From another computer you can see the examples application by browsing to, http://www.krypton.com:8180/examples/ where if www.krypton.com is not a real dns, use the server's IP address or add a host file entry to your client system.
Additional Layers
In my experience all my real world systems do not need any more layers to Tomcat. However, there are some odd scenarios which are covered here.
Automatic Startup and Shutdown of Tomcat
Not recommend until you proper monitoring in place. If you system reboots you want to know about it.
Even then, most Enterprise simply do not have automatic startup setup. The closest I have personally seen is a delayed startup. The reason being that the appliction server itself may hang the entire machine.
In a Cloud world this is more self-contained so this section will be written out in the future.
This section is still to be written.
Setup SSL on Tomcat
For testing purposes or if the only thing you want to do is encrypt the channel of communication you can Setup a Self-Signed Certificate for Tomcat.
Otherwise, Setup of a Real SSL Certificate for Tomcat is very similar but with a few extra steps.
The more enterprise solution is to front Tomcat with Apache and setup SSL on Apache.
UTF-8
I have only used this in Production with Confluence.
My other i18n projects seem to work fine without this parameter.
More testing and research is needed to determine why and if this is a good idea in general.
If the application written posts with UTF-8 then you need to make sure the connector can handle UTF-8.
Modify server.xml as follows,
<Connector port="8180" URIEncoding="UTF-8"/>
If you plan to use mod_jk then also adjust the appropriate connector,
<Connector port="8109" protocol="AJP/1.3" redirectPort="8643" URIEncoding="UTF-8" />
References
http://wiki.apache.org/tomcat/FAQ/CharacterEncoding#Q9 - still to finish reading
http://confluence.atlassian.com/display/DOC/Configuring+Tomcat%27s+URI+encoding?focusedCommentId=231343170&#comment-231343170 - Confluence related notes